Wednesday 16 December 2015
Oracle Technical : How to find Files Versions and Locations
for eg. if Application Name is ‘Oracle Quoting’
SELECT application_name, application_short_name, decode (status, ‘I’, ‘Installed’, ‘S’, ‘Shared’, ‘Not Installed’) status, a.application_id
find . -name “hello*.c” –print
For UNIX, the command is as follows:
cd $PO_TOP/bin
PO_TOP/ADMIN/SQL
FND_TOP/patch/115/import
strings -a RCVCOTRX.pll | grep ‘Header’
cd $INV_TOP/bin
Find where the JAVA_TOP is
Refreshing an 11i Database using Rman
In order to facilitate troubleshooting we
maintain a test environment which is a nightly copy of our 11i production
environment. Since this environment is usually used to test data fixes it has to
be as up to date as possible. To perform the database refresh we use rman's
duplicate feature.
The goal of this article isn't just to provide the entire set of scripts and send you on your way. I think its safe to say that most EBS environments aren't identical, so its not like you could take them and execute with no issues. Instead i'll highlight the steps we follow and some of the key scripts.
NOTE: This doesn't include any pre-setup steps such as, if this is the first time duplicating the database make sure you have the parameters db_file_name_convert and log_file_name_convert specified in your test environments init file.
Step 10: Perform any
custom/environment specific steps. We have some custom modules which required
some modifications as part of cloning.
Step 11: Startup all of the
application processes. ($S_TOP/adstrtal.sh)
NOTE: If you have an application tier you may have to run autoconfig before starting up the services.
Hopefully this article was of some use even tho it was pretty vague at times. If you have any questions feel free to ask. Any corrections or better methods don't hesitate to leave a comment either.
The goal of this article isn't just to provide the entire set of scripts and send you on your way. I think its safe to say that most EBS environments aren't identical, so its not like you could take them and execute with no issues. Instead i'll highlight the steps we follow and some of the key scripts.
NOTE: This doesn't include any pre-setup steps such as, if this is the first time duplicating the database make sure you have the parameters db_file_name_convert and log_file_name_convert specified in your test environments init file.
- Step 1: Shutdown the test environment.
If you are using 10g then remove any tempfiles. In 10g, rman now includes
tempfile information and if they exist you will encounter errors. Check this
previous post. Startup the database in nomount mode.
- Step 2: Build a Rman Script. There
are a couple of ways to recover to a point in time and we have decided to use
SCN numbers. Since this process needs to be automated, we query productions rman
catalog and determine the proper SCN to use and build an rman script. Here it
is:
set feedback off
set echo off
set serverout on
spool $HOME/scripts/prod_to_vis.sql
declare
vmax_fuzzy number;
vmax_ckp number;
scn number;
db_name varchar2(3) := 'VIS';
log_file_dest1 varchar2(30) := '/dbf/visdata/';
begin
select max(absolute_fuzzy_change#)+1,
     max(checkpoint_change#)+1
     into vmax_fuzzy, vmax_ckp
from rc_backup_datafile;
if vmax_fuzzy > vmax_ckp then
scn := vmax_fuzzy;
else
scn := vmax_ckp;
end if;
dbms_output.put_line('run {');
dbms_output.put_line('set until scn '||to_char(scn)||';');
dbms_output.put_line('allocate auxiliary channel ch1 type disk;');
dbms_output.put_line('allocate auxiliary channel ch2 type disk;');
dbms_output.put_line('duplicate target database to '||db_name);
dbms_output.put_line('logfile group 1 ('||chr(39)||log_file_dest1||'log01a.dbf'||chr(39)||',');
dbms_output.put_line(chr(39)||log_file_dest1||'log01b.dbf'||chr(39)||') size 10m,');
dbms_output.put_line('group 2 ('||chr(39)||log_file_dest1||'log02a.dbf'||chr(39)||',');
dbms_output.put_line(chr(39)||log_file_dest1||'log02b.dbf'||chr(39)||') size 10m;}');
dbms_output.put_line('exit;');
end;
/
spool off;

This script produces a spool file called, prod_to_vis.sql:

run {
set until scn 14085390202;
allocate auxiliary channel ch1 type disk;
allocate auxiliary channel ch2 type disk;
duplicate target database to VIS
logfile group 1 ('/dbf/visdata/log01a.dbf',
'/dbf/visdata/log01b.dbf') size 10m,
group 2 ('/oradata/dbf/visdata/log02a.dbf',
'/dbf/visdata/log02b.dbf') size 10m;}
exit;
Note: Our production nightly backups are on disk which are NFS mounted to our test server.
- Step 3: Execute the rman script. Launch rman, connect to the target,
catalog, auxiliary and execute the script above:
ie.
rman> connect target sys/syspasswd@PROD catalog rmancat/catpasswd@REPO auxiliary /
You may want to put some error checking around rman to alert you if it fails. We have a wrapper script which supplies the connection information and calls the rman script above. Our refresh is critical so if it fails we need to be paged.rman @$SCRIPTS/prod_to_vis.sql if [ $? != 0 ] then echo Failed echo "RMAN Dupcliate Failed!"|mailx -s "Test refresh failed" pageremail@mycompany.com exit 1 fi
- Step 4: If production is in
archivelog mode but test isn't, then mount the database and alter database
noarchivelog;
- Step 5: If you are using a hotbackup
for cloning then you need to execute adupdlib.sql. This updates libraries with
correct OS paths. (Appendix
B of Note:230672.1)
- Step 6: Change passwords. For
database accounts such as sys, system and other non-applications accounts change
the passwords using alter user. For applications accounts such as apps/applsys,
modules, sysadmin, etc use FNDCPASS to change their passwords.
ie. To change the apps password:
FNDCPASS apps/<production appspassword=> 0 Y system/<system_passwd> SYSTEM applsys <new apps passwd>
- Step 7: Run autoconfig.
- Step 8: Drop any database links that
aren't required in the test environment, or repoint them to the proper test
environments.
- Step 9: Follow Section 3: Finishing
Tasks of Note:230672.1
- Update any profile options which have still reference the production
instance.
Example:
UPDATE FND_PROFILE_OPTION_VALUES SET
profile_option_value = REPLACE(profile_option_value,'PROD','TEST')
WHERE profile_option_value like '%PROD%
Specifically check the FND_PROFILE_OPTION_VALUES, ICX_PARAMETERS, WF_NOTIFICATION_ATTRIBUTES and WF_RESOURCES tables and look for production hostnames and ports. We also update the forms title bar with the date the environment was refreshed:
UPDATE apps.FND_PROFILE_OPTION_VALUES SET
profile_option_value = 'TEST:'||' Refreshed from '||'Production: '||SYSDATE
WHERE profile_option_id = 125
; - Cancel Concurrent requests. We don't
need concurrent requests which are scheduled in production to keep running in
test. We use the following update to cancel them. Also, we change the number of
processes for the standard manager.
update fnd_concurrent_requests
set phase_code='C',
status_code='D'
where phase_code = 'P'
and concurrent_program_id not in (
select concurrent_program_id
from fnd_concurrent_programs_tl
where user_concurrent_program_name like '%Synchronize%tables%'
or user_concurrent_program_name like '%Workflow%Back%'
or user_concurrent_program_name like '%Sync%responsibility%role%'
or user_concurrent_program_name like '%Workflow%Directory%')
and (status_code = 'I' OR status_code = 'Q');
update FND_CONCURRENT_QUEUE_SIZE
set min_processes = 4
where concurrent_queue_id = 0;
- Update any profile options which have still reference the production
instance.
NOTE: If you have an application tier you may have to run autoconfig before starting up the services.
Hopefully this article was of some use even tho it was pretty vague at times. If you have any questions feel free to ask. Any corrections or better methods don't hesitate to leave a comment either.
Thanks
Srini
R12 - Cloning from an RMAN backup using duplicate database
Since most DBA's are using rman for their
backup strategy I thought I would put together the steps to clone from an rman
backup. The steps you follow are pretty much the same as described in Appendix
A: Recreating the database control files manually in Rapid Clone in Note 406982.1 - Cloning Oracle Applications Release 12
with Rapid Clone.
Here are the steps:
Here are the steps:
- Execute preclone on all tiers of the source system. This includes both the
database and application tiers. (For this example, TEST is my source
system.)
For the database execute: $ORACLE_HOME/appsutil/scripts/<context>/adpreclone.pl dbTier
Where context name is of the format <sid>_<hostname>
For the application tier: $ADMIN_SCRIPTS_HOME/adpreclone.pl appsTier
- Prepare the files needed for the clone and copy them to the target
server.
- Take a FULL rman backup and copy the files to the target server and place
them in the identical path. ie. if your rman backups go to /u01/backup on the
source server, place them in /u01/backup on the destination server. To be safe,
you may want to copy some of the archive files generated while the database was
being backed up. Place them in an identical path on the target server as
well.
- Application Tier: tar up the application files and copy them to the destination server. The cloning document referenced above ask you to take a copy of the $APPL_TOP, $COMMON_TOP, $IAS_ORACLE_HOME and $ORACLE_HOME. Normally I just tar up the System Base Directory, which is the root directory for your application files.
- Database Tier: tar up the database $ORACLE_HOME.
ex. from a single tier system. The first tar file contains the application files and the second is the database $ORACLE_HOME
[oratest@myserver TEST]$ pwd
/u01/TEST
[oratest@myserver TEST]$ ls
apps db inst
[oratest@myserver TEST]$ tar cvfzp TEST_apps_inst_myserver.tar.gz apps inst
.
.
[oratest@myserver TEST]$ tar cvfzp TEST_dbhome_myserver.tar.gz db/tech_stNotice for the database $ORACLE_HOME I only added the db/tech_st directory to the archive. The reason is that the database files are under db/apps_st and we don't need those. - Copy the tar files to the destination server, create a directory for your
new environment, for example /u01/DEV. (For the purpose of this article I will
be using /u01/DEV as the system base for the target envrionment we are building
and myserver is the server name.)
- Extract each of the tar files with the command tar xvfzp
Ex. tar xvfzp TEST_apps_inst_myserver.tar.gz
- Take a FULL rman backup and copy the files to the target server and place
them in the identical path. ie. if your rman backups go to /u01/backup on the
source server, place them in /u01/backup on the destination server. To be safe,
you may want to copy some of the archive files generated while the database was
being backed up. Place them in an identical path on the target server as
well.
- Configure the target system.
- On the database tier execute adcfgclone.pl with the dbTechStack
parameter.
For example. /u01/DEV/db/tech_st/10.2.0/appsutil/clone/bin/adcfgclone.pl dbTechStack
By passing the dbTechStack parameter we are tell the script to configure only the necessary $ORACLE_HOME files such as the init file for the new environment, listener.ora, database environment settings file, etc. It will also start the listener.
You will be prompted the standard post cloning questions such as the SID of the new environment, number of DATA_TOPS, Oracle Home location, port settings, etc.
Once this is complete goto /u01/DEV/db/tech_st/10.2.0 and execute the environment settings file to make sure your environment is set correctly.
[oradev@myserver 10.2.0] . ./DEV_myserver.env
- On the database tier execute adcfgclone.pl with the dbTechStack
parameter.
- Duplicate the source database to the target.
- In order to duplicate the source database you'll need to know the scn value
to recover to. There are two wasy to do this. The first is to login to your rman
catalog, find the Chk SCN of the files in the last backupset of your rman backup
and add 1 to it.
Ex. Output from a rman> List backups
.
.
List of Datafiles in backup set 55729
File LV Type Ckp SCN Ckp Time Name
---- -- ---- ---------- --------- ----
7 1 Incr 5965309363843 15-JUN-09 /u02/TEST/db/apps_st/data/owad01.dbf
..
So in this case the SCN we would be recovery to is 5965309363843 + 1 = 5965309363844.
The other method is to login to the rman catalog via sqlplus and execute the following query:
select max(absolute_fuzzy_change#)+1,
max(checkpoint_change#)+1
from rc_backup_datafile;
Use which ever value is greater.
- Modify the db_file_name_convert and log_file_name convert parameters in the
target init file. Example:
db_file_name_convert=('/u02/PROD/db/apps_st/data/', '/u02/DEV/db/apps_st/data/',
'/u01/PROD/db/apps_st/data/', '/u02/DEV/db/apps_st/data/')
log_file_name_convert=(/u02/PROD/db/apps_st/data/', '/u02/DEV/db/apps_st/data/',
'/u01/PROD/db/apps_st/data/', '/u02/DEV/db/apps_st/data/') - Verify you can connect to source system from the target as sysdba. You will
need to add a tns entry to the $TNS_ADMIN/tnsnames.ora file for the source
system.
- Duplicate the database. Before we use rman to duplicate the source database
we need to start the target database in nomount mode.
Start rman:
rman target sys/<syspass>@TEST catalog rman/rman@RMAN auxiliary /
If there are no connection errors duplicate the database with the following script:
run {
set until scn 5965309363844;
allocate auxiliary channel ch1 type disk;
allocate auxiliary channel ch2 type disk;
duplicate target database to DEV }
The most common errors at this point are connection errors to the source database and rman catalog. As well, if the log_file_name_convert and db_file_name_convert parameters are not set properly you will see errors. Fix the problems, login with rman again and re-execute the script.
When the rman duplicate has finished the database will be open and ready to proceed with the next steps.
- Execute the library update script:
cd $ORACLE_HOME/appsutil/install/DEV_myserver where DEV_myserver is the <context_name> of the new environment.
sqlplus "/ as sysdba"@adupdlib.sql
If your on linux replacewith so, HPUX with sl and for windows servers leave blank. - Configure the target database
cd $ORACLE_HOME/appsutil/clone/bin/adcfgclone.pl dbconfig
Whereis $ORACLE_HOME/appsutil/DEV_myserver.xml
- In order to duplicate the source database you'll need to know the scn value
to recover to. There are two wasy to do this. The first is to login to your rman
catalog, find the Chk SCN of the files in the last backupset of your rman backup
and add 1 to it.
- Configure the application tier.
cd /u01/DEV/apps/apps_st/comn/clone/bin
perl adcfgclone.pl appsTier
You will be prompted the standard cloning questions consisting of the system base directories, which services you want enabled, port pool, etc. Make sure you choose the same port pool as you did when configuring the database tier in step 3.
Once that is finished, initialize your environment by executing
. /u01/DEV/apps/apps_st/appl/APPSDEV_myserver.env
- Shutdown the application tier.
cd $ADMIN_SCRIPTS_HOME
./adstpall.sh apps/<source apps pass>
- Login as apps to the database and execute:
exec fnd_conc_clone.setup_clean;
I don't believe this step is necessary but if you don't do this you will see references to your source environment in the FND_% tables. Every time you execute this procedure you need to run autoconfig on each of the tiers (db and application). We will get to that in a second.
- Change the apps password. Chances are you don't want to have the same apps
password as the source database, so its best to change it now while the
environment is down.
With the apps tier environment initialized:
FNDCPASS apps/<source apps pass> 0 Y system/<source system pass>> SYSTEM APPLSYS <new apps pass>
- Run autoconfig on
both the db tier and application tier.
db tier:
cd $ORACLE_HOME/appsutil/scripts/DEV_myserver
./adautocfg.sh
Application Tier
cd $ADMIN_SCRIPTS_HOME
./adautocfg.sh
- If there are no
errors with autoconfig start the application. Your already in the
$ADMIN_SCRIPTS_HOME so just execute:
./adstrtal.sh apps/<new apps pass>
- Login to the
application and perform any post cloning activities. You may want to override
the work flow email address so that notifications goto a test/dev mailbox
instead of users. We always change the colors and site_name profile options,
etc. More details can be found in Section 3: Finishing tasks of the R12 cloning
document referenced earlier.
Thanks
Srini
SOA Upgrade 11.1.1.3 -> 11.1.1.6
We upgraded our SOA install from 11.1.1.3
to 11.1.1.6 and hit a few issues. One of the main issues was that after
upgrading DEV our inflight processes disappeared. We talked back and forth
with Oracle and it was supposed to be supported but for some reason it wasn't
working for us. I know that from SOA 10g to SOA 11g in-flight processes are
not supported as part of the upgrade.
One of the ways we use BPEL is workflow for a custom application. It could take months for a workflow to complete and there are always in-flight processes. So there is never a quiet time, or a point at which all workflows are complete to do the upgrade.
We put a plan in place to manually re-place all items back in the proper stage. It seems like it was going to be a fair amount of effort so for DEV we only re-placed a subset of items to make sure we had the process correct.
However, once we upgrade TEST the in-flight processes somehow magically survived. We aren't sure why, there could be some small inconsistencies between DEV and TEST which caused it. Another reason could be that in DEV we upgraded to 11.1.1.6 first, then at a later point upgraded to 11.1.1.6.6. In TEST we went directly to 11.1.1.6.6.
The SOA upgrade itself isn't a very resilient process. If the PSA (Patch Set Assistant) gets interrupted for some reason its not smart enough to recover. In DEV it wasn't a big issue, I had an export of the MDS and SOAINFRA schemas and I just dropped and recreated. For PROD tho, the amount of data, thus downtime, would prevent us from doing this. We only hit an issue once in DEV and TEST was smooth, so for PROD we all had our fingers cross.
The PROD install was going smoothly until I had to run the PSA. Shortly after I started the schema upgrade it failed and a dreaded error appeared. In the $FMW_HOME/oracle_common/upgrade/logs directory I found:
[2013-08-21T19:28:09.239-04:00] [SOA] [ERROR] [] [upgrade.SOA.SOA1] [tid: 13] [ecid: 0000K2ZD5BJ9lZWpPws1yd1I5Klw000004,0] [[
oracle.sysman.assistants.common.dbutil.SQLFatalErrorException: java.sql.SQLException: ORA-00054: resource busy and acquire with NOWAIT specified or timeout expired
The problem was a database session holding a lock in the SOAINFRA schema.
We hit this problem in DEV and the solution was to shutdown applications that
access SOAINFRA tables and change the schema password. However, I didn't
notice a hung database session by one of our custom applications.
If you try to run the PSA again it says the SOAINFRA schema isn't valid and
won't let you continue with the upgrade. So I tried manually updating the
registry to state the schema is valid.
update
schema_version_registry set status='VALID' where
mr_name='SOAINFRA';
Great! The installer started up again but it quickly failed. Checking the
logs:
2013-08-21
19:36:19.378 rcu:Extracted SQL Statement: [ALTER TABLE BPM_CUBE_PROCESS ADD
(SubType VARCHAR2(200), DeploymentInfo BLOB)]
2013-08-21
19:36:19.378 rcu:Statement Type: 'DDL Statement'
JDBC
SQLException - ErrorCode: 1430SQLState:72000 Message: ORA-01430: column being
added already exists in table
Since this was production, I opened a P1 SR with Oracle right away. In
these situations I try to get Oracle involved as quickly as possible. I'll
still continue to do research on my end. Sometimes I find the solution quicker,
sometimes Oracle Support does.
This time I found the following note:
Patch
Set Assistant Failed for SOA 11.1.1.6.0 when Patch 13606871 is Applied on SOA
11.1.1.5.0 (Doc ID 1517404.1)
It provided a set of SQL statements to help rollback the
schema upgrade. Only problem was my upgrade was from 11.1.1.3, not 11.1.1.5.
Knowing that Oracle now supported manually rolling back the upgrade, then I
looked at the script that was failing:
/u01/app/oracle/product/fmw11g_SOA/SOAHome_1/rcu/integration/soainfra//sql/upgrade_soainfra_111130_111140_oracle.tsql
After a few trial
and errors I managed to write a script to undo all the changes.
Unfortunately if you missed one, which was easy to do as the script is a few
thousand lines, you had to start over. Finally I managed to find all updated
objects and continued with the upgrade.
Another upgrade issue I encountered showed itself in the startup logs for
soa_server1:
| java.sql.SQLException: ORA-25226: dequeue failed, queue UPG_SOAINFRA.EDN_OAOO_QUEUE is not enabled for dequeue |
The solution to this problem was to manually restart the queues:
| SQL> show user | |||||
| USER is "UPG_SOAINFRA" | |||||
| SQL> exec dbms_aqadm.start_queue('IP_OUT_QUEUE',true,true); | |||||
| PL/SQL procedure successfully completed. | |||||
| SQL> exec dbms_aqadm.start_queue('EDN_OAOO_QUEUE',true,true); | |||||
| PL/SQL procedure successfully completed. | |||||
After the startup we waited anxiously to hear from the superusers to let us
know the status of in-flight processes. To much celebration (more so from
them than us since they had alot of potential work to do) in-flight processes
did not disappear.
Thanks
Srini
Setting up VMware and Linux for a 10g RAC Install
Part 1: Setting up VMware and Linux for a 10g RAC Install
Just a few comments..... This guide assumes
you have some knowledge of installing Linux. The steps below are not 100%
step-by-step but it is pretty close. They are also steps that I have taken,
there is no guarantee it will work for you or that you won't encounter issues I
haven't. As well, if this was a production environment or even a real test
environment, the install would be different.
A couple of people are going through the steps now... I'll update this page to reflect any issues they have encountered or items that may require further clarification. I'll admit up front that the steps could be more efficient. So feel free to post or email comments, errors, etc...
The reason I am posting this is because I couldn't find a complete guide online that worked for me. So hopefully it will be of use to someone else.... Part 2, Installing OCR, ASM and the database software and Part 3, issues and solutions will follow shortly.
- Download VMware Server and Oracle Enterprise Linux version 5. For this install I burnt OEL 5 to CD.
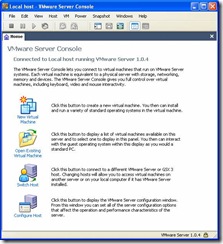
- Install VMware
- Launch VMware Server Console and select New Virtual Machine:
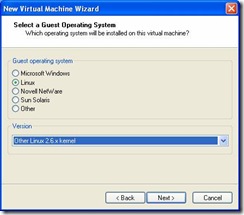
- Choose a Custom install and Select Guest Operating System
- Select a Virtual Machine name and Location. Enter: raclinux1.

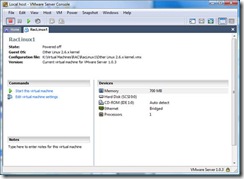
- Select Virtual Memory. For this install I choose 720MB which I believe is
the same as the demo environments Oracle shipped. Keep in mind that the guides
recommend a minimum of 1GB.

- Network Type. Select Use Bridged Networking:

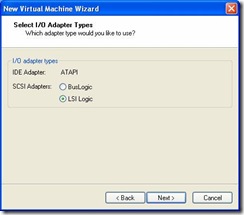
- I/O Adapter type. Select LSI Logic:
- Create a virtual disk to house the Linux install and Oracle Software. You
will need around 4GB for the Oracle software and 3GB for the Linux install
options that I will choose later on.

On the next screen choose SCSI. - Specify the size of your virtual disk. Unless you plan on selecting
Allocate all disk space now, then it doesn’t really matter what size you
select for the disk. VMware will grow the disk as needed and the value specified
will be a hard limit. Note: Performance is better if you allocate all disk
now.

On the following screen choose a file name for your image. Enter raclinux.vmx - Make sure you have the Enterprise Linux cdrom loaded and start your virtual
machine:
- You should now see the following screen:
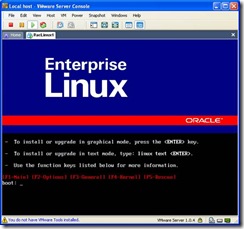
Hit> to start the install. - The following doesn’t show detailed screenshots of how Linux was installed.
It will briefly list some of key options/configs that were choosen.
Here is the partition information. By default your swap partition may be larger, I resized mine. If this was a real server the partitioning would be drastically different but for a vmware RAC playground this is fine.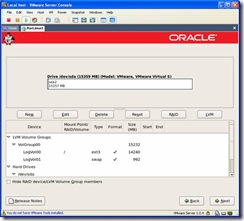
- When you arrive at the Network Devices screen, enter raclinux1 for
the hostname and 192.168.0.1 for the gateway.
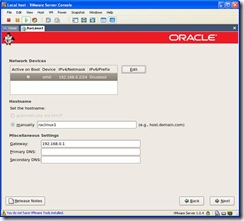
Click on edit and you will see the following screen. Make sure DHCP is deselected and enter an IP address. For this install private IP Address space is being used so enter 192.168.0.2.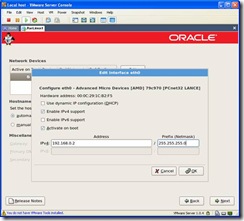
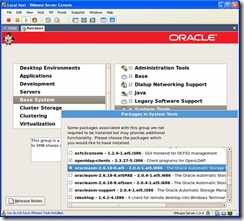
- At this point you’ll be installing the software. I choose the customize
option and selected a number of options including, X Window System, Server
Configuration Tools, FTP Server, Development tools, Administration Tools and
System tools. Regardless of which way you choose to install linux, verify the
following packages are selected. In Legacy Network Server, verify rsh-server and
telnet-server are selected. In System Tools, verify oracleasm and
oracleasm-support are selected. Development Tools, specifically gcc will be
needed for the vmware tools install below in step 31.
Once the software has finished installing, click on reboot and verify the OS boots up properly and complete the post-install tasks.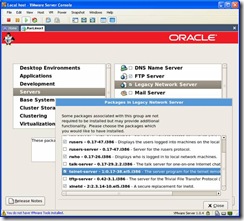
Once the install is complete there is a reboot.
- After the reboot there are post-install configuration tasks where you’ll be
asked the current time, firewall settings etc. Disable the firewall and SELinux.
Since this is only a sandbox security isn’t a concern and leaving the firewall
enabled will cause some issues later.

Choosing this option will require another reboot in which the filesystem will be relabeled. - When prompted to create a user, use the name oracle. We’ll fix it up with
the correct groups, etc, later.
Once the post-install is complete there will be another reboot. Once the environment has restarted, shutdown the VM. The next phase is to add the shared storage configuration. - Shared Disk Setup. Next we have to create the shared storage. For
this configuration we’ll be creating 3 voting disks, 2 disk for OCR (Oracle
Clusterware) files and 1 disk for ASM (which will house the database files). So
you will need to complete the following steps 5 times. Reference the following
chart for data you will have to enter:
TypeDisk SizeFilenameVirtual Device NodeVoting Disk 10.5GBVotingdisk1.vmdkSCSI 1:0Voting Disk 20.5GBVotingdisk2.vmdkSCSI 1:1OCR Disk 10.5GBOCRdisk1.vmdkSCSI 1:2OCR Disk 20.5GBOCRdisk2.vmdkSCSI 1:3ASM Disk5GBASMdisk1.vmdkSCSI 1:4Voting Disk 30.5GBVotingdisk3.vmdkSCSI 1:5
· In the VMware Server Console, click “Edit virtual machine settings”, click on the add button, select Hard Disk under Hardware types and click on next:
· Select “Create a New Virtual Disk” -> Next (button) -> type SCSI -> Next ->;enter the Disk size (as above) -> Next -> Filename (as above). Since these are shared disks you should save them in a different folder than your vmware image. Ie, if in step 5 you selected the location c:\Virtual Machines\Raclinux1 then you may want to select c:\Virtual Machines\RacSharedStorage for the shared disks.
· Click on the Advanced Tab, change Virtual Device Node as per chart above and Independent:Persistent for Mode:
- Add Ethernet Adapter. By default a VM comes with an Ethernet adapter
created. We need to add another one for the private interconnect. So under the
Virtual Machine Settings, which is the same place you were to add additional
hard drives, click on Add ->
Ethernet Adapter ->
Next ->
Select Host-only network connection ->
Finish.

You should now have something similar to the screenshot below:
- Shared Disk Config. In order to enable disk sharing for the disks we
just created, we need to modify the virtual machine configuration file. From the
VMware Server Console you can find the location of your configuration file in
the top left hand corner.
Before the line:
scsi1.present = "TRUE"
Add:
disk.locking = "FALSE"
diskLib.dataCacheMaxSize = "0"
scsi1.sharedBus = "virtual”
After each line similar to:
scsi1:0.mode = "independent-persistent"
Add:
scsi1:0.deviceType = "disk”
Note the bold 0, make sure that for each device you put in the correct number. For the first device its 0, followed by 1, etc. ie. A small snip of my config file.disk.locking = "FALSE" diskLib.dataCacheMaxSize = "0" scsi1.sharedBus = "virtual" scsi1.present = "TRUE" scsi1:0.present = "TRUE" scsi1:0.fileName = "c:\Virtual Machines\sharedstorage\OCRDisk1.vmdk" scsi1:0.mode = "independent-persistent" scsi1:0.deviceType = "disk" scsi1:1.present = "TRUE" scsi1:1.fileName = "c:\Virtual Machines\sharedstorage\OCRDisk2.vmdk" scsi1:1.mode = "independent-persistent" scsi1:1.deviceType = "disk"
Save the file and start up the VM.
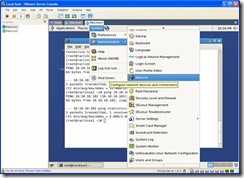
- Login as root and go to Network Configuration:

On the following screen select eth0 and click on edit. (If you configured Eth0 above when you installed linux, you can skip down to Eth1.)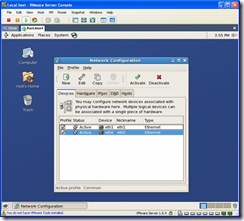
Select Statically set IP addresses. Change the IP Address to 192.168.0.2, Subnet mask to 255.255.255.0 and Gateway to 192.168.0.1.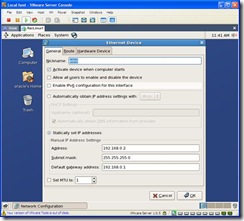
Click on OK. Now select Eth1 (this is the Private Interconnect) and click on edit. Select Statically set IP addresses. Change the IP Address to 10.10.10.102 and Subnet mask to 255.255.255.0.
To enable the changes go back to the Network Configuration screen, highlight an Ethernet adapter, click on deactivate. Once the status changes to Inactive click on Activate. Or you can simply reboot.
Once the reboot has completed or network services restarted we can proceed with setting up the OS.
- Verify Kernel Parameters.
To verify parameters, you can use the sysctl command. However, since this is a fresh install there are the entries I had to make to the /etc/sysctl.conf file:
Kernel.sem = 250 32000 100 128
Kernel.shmni = 4096
Fs.file-max=65536
Rmem_max=262144
Rmem_default=262144
Wmem_default=262144
Wmem_max=262144
Net.ipv4.ip_local_port_range = 1024 65000
A default Enterprise Linux install already has shmmax and shmall set higher than the pre-reqs.
- Verify Package requirements. Using rpm –qa verify the following
packages are installed. If they are not, they can be found on the following
disks:
Disk 2
libXp-1.0.0-8.i386
Disk3
compat-db-4.2.52-5.1.i386.rpm
openmotif-2.3.0-0.3.el5.i386.rpm
 If
you need to install these packages, place the insert the correct CD and wait for
Linux to mount it. Once its mounted a cd icon will appear on your desktop. Open
it and traverse to the Server directory. Double click on the file to install it.
You will be prompted for the root password if your not logged in as
root.
If
you need to install these packages, place the insert the correct CD and wait for
Linux to mount it. Once its mounted a cd icon will appear on your desktop. Open
it and traverse to the Server directory. Double click on the file to install it.
You will be prompted for the root password if your not logged in as
root.
- Enable Hangcheck-timer. This is a kernel module which monitors the OS
for hangs and if one occurs, reboots the server. This should already be
installed but not enabled. To enable add the following entry to
/etc/modprobe.conf
options hangcheck-timer hangcheck_tick=30 hangcheck_margin=180
Without rebooting you can load this kernel module by executing the command:
/sbin/modprobe –v hangcheck-timer
To verify its running:
[root@raclinux1]# /sbin/lsmod | grep –i hang
hangcheck_timer 8025 0
Hangcheck_tick is the interval in which the module checks for hangs. Hangcheck_margin is how long the module waits for a response. If the system doesn’t respond within the sum of these two parameters, the system is rebooted. So in this case, if there is no response in 210 seconds, the server reboots.
- Modify /etc/hosts so it looks like the following:
127.0.0.1     localhost
192.168.0.2    raclinux1
192.168.0.102    raclinux1-vip
10.10.10.102     raclinux1-priv
192.168.0.3    raclinux2
192.168.0.103    raclinux2-vip
10.10.10.103    raclinux2-priv
- User shell limits
Add the following to /etc/security/limits.conf:* soft nproc 2047 * hard nproc 16384 * soft nofile 1024 * hard nofile 65536
Add the following line to /etc/pam.d/login
session required /lib/security/pam_limits.so
- Groups and User. Next we need to create an oracle unix account and two
groups, oinstall and dba
/usr/sbin/groupadd -g 500 oinstall
/usr/sbin/groupadd -g 501 dba
If you didn’t create an oracle account when you performed the Linux install:/usr/sbin/useradd –u 500 –d /home/oracle –g “oinstall” –G “dba” –m –s /bin/bash oracle
If you did create the oracle account in the steps above then you need to modify the account and add it to the oinstall and dba groups.

Double click on the oracle user, click on the groups tab and select the groups dba and oinstall. Select oinstall as the primary group: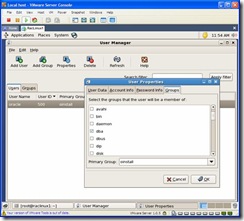
- Download and install ASMLib
Goto http://www.oracle.com/technology/software/tech/linux/asmlib/rhel5.html and download asmlib for your architecture.
For the OEL 5 version I have installed the correct file is: http://otn.oracle.com/software/tech/linux/asmlib/files/RPMS/rhel5/x86/2.0.3/oracleasmlib-2.0.3-1.el5.i386.rpm

- Partition the raw volumes for the Voting, OCR and ASM disks. For each device
(/dev/sdb, /dev/sdc, /dev/sdd, /dev/sde, /dev/sdf, /dev/sdg) perform the
following (responses are in bold):
# fdisk /dev/sdb Command (m for help): n Command action e extended p primary partition (1-4) p Partition number (1-4): 1 First cylinder (1-512, default 1):<enter> Using default value 1 Last cylinder or +size or +sizeM or +sizeK (1-512, default 512):
> Using default value 512 Command (m for help): w The partition table has been altered! Calling ioctl() to re-read partition table. Syncing disks. - Bind the above partitions to raw devices. Edit
/etc/udev/rules.d/60-raw.rules and add:
ACTION=="add", KERNEL=="sdb1", RUN+="/bin/raw /dev/raw/raw1 %N"
ACTION=="add", KERNEL=="sdc1", RUN+="/bin/raw /dev/raw/raw2 %N"
ACTION=="add", KERNEL=="sdd1", RUN+="/bin/raw /dev/raw/raw3 %N"
ACTION=="add", KERNEL=="sde1", RUN+="/bin/raw /dev/raw/raw4 %N"
ACTION=="add", KERNEL=="sdg1", RUN+="/bin/raw /dev/raw/raw6 %N"
Create a file, /etc/udev/rules.d/99-raw.rules and add:
KERNEL=="raw[3-4]", OWNER="root", GROUP="dba", MODE="640"
KERNEL=="raw[1-2]", OWNER="oracle", GROUP="oinstall", MODE="660"
KERNEL=="raw[5-6]", OWNER="oracle", GROUP="oinstall", MODE="660"
This will not come into effect until you reboot.
- Install VMware tools. On the VMware Server Console, click on the menu item
VM ->
Install VMware Tools.

Click on the VMwareTools*.rpm file, when prompted for the root password enter it. When the Installing Packages window appears click on apply. You may get a window saying the rpm can’t be verified, click Install anyway.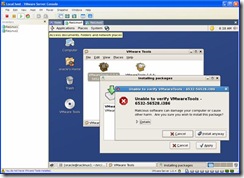
As root launch vmware-config-tools.pl from the command line. When prompted to build the vmhgfs module say no unless you have the kernel source installed. Whem prompted for others say yes. At the end you will be prompted for a screen resolution size, pick the value you’d like.
Note: If this isn't working for you, login as Oracle and try again.
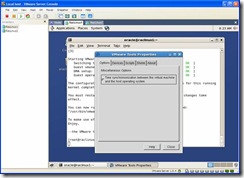
- As root run vmware-toolbox. Select the “Time
synchrononization between the virtual machine and the host operating
system” option.
Again, as root, edit the /boot/grub/grub.conf file and enter “clock=pit nosmp noapic nolapic” to the kernel line. I would suggest that you create a new kernel config in case you make a typo: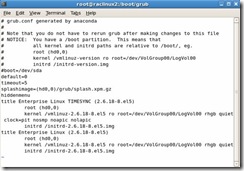
- Shutdown linux and prepare to copy the vmware image to create another
server.
/sbin/shutdown –h now
or click the Stop button on the toolbar of the VMware Server Console.
- Once the vmware instance has been shutdown copy your RacLinux1 folder to
RacLinux2. In my case I have it installed under c:\Oracle\Virtual
Machines\RacLinux1. Two methods to do this:
· Start up Windows Explorer, navigate to the directory above, right click on RacLinux1 and select copy. Right click in the folder and select paste. Then rename the “Copy of RacLinux1” to Raclinux2.
· From a command prompt type:
cd c:\
cd Oracle\Virtual Machines
cp RacLinux1 RacLinux2
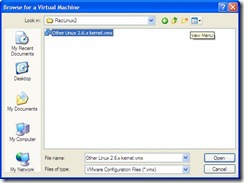
- Back in your VMware Server Console, select File -> Open -> Browse,
navigate to the Raclinux2 virtual machine location, c:\Oracle\Virtual
Machines\Raclinux2, select the .vmx file and click on open.
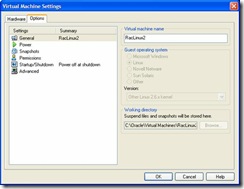
- RacLinux2 will now show up in your inventory. Right click on RacLinux2 and
select Settings. When the settings window opens click on the options table and
change the Virtual Machine name to RacLinux2:
- Leaving the RacLinux1 VM down, startup RacLinux2. We now need to change its
network properties. Once the vm has started, login as root. Click on the menu
item, System -> Administration ->
Network:
· If you have devices eth0.bak and eth1.bak, uncheck each one under the profile option followed by clicking on the delete button.
· For eth0 and eth1 change the IP Address to 192.168.0.3 and 10.10.10.103 respectively.
· Click on the DNS tab and change your hostname to raclinux2
· For each eth0 and eth1, click on the deactivate button, followed by the activate button. When prompted to save changes click yes.
Now you can start the RacLinux1 VM. Once both are up and running, verify that you can ping the other from each node.
- User Equivalence - In order to RAC to install properly user
equivalence must be setup. This allows the oracle user to remotely login to the
other node without supplying a password to be able to copy the software during
the install.
· On each node, as oracle, execute:
/usr/bin/ssh-keygen -t rsa
/usr/bin/ssh-keygen -t dsa
· Concatenate id_dsa.pub from both nodes into the authorized keys file on the first node:[oracle@raclinux1 ~]$ cat ~/.ssh/id_rsa.pub >> ~/.ssh/authorized_keys [oracle@raclinux1 ~]$ cat ~/.ssh/id_dsa.pub >> ~/.ssh/authorized_keys [oracle@raclinux1 ~]$ ssh raclinux2 “cat ~/.ssh/id_rsa.pub” >> ~/.ssh/authorized_keys [oracle@raclinux1 ~]$ ssh raclinux2 “cat ~/.ssh/id_dsa.pub” >> ~/.ssh/authorized_keys
· Copy the authorized_keys file on raclinux1 to raclinux2:
[oracle@raclinux1 ~]$ scp ~/.ssh/authorized_keys raclinux2:/home/oracle/.ssh/
· Test the connection. On raclinux1 type:
ssh raclinux2 date
You should do this for every combination of server and hostname. ie. From raclinux2, type ssh raclinux1 date. As well as ssh raclinux2-priv, ssh raclinux1-priv from each host.
Example output:
RacLinux1: [After
the below on raclinux2 has been completed]
[After
the below on raclinux2 has been completed] RacLinux2:
- On each node, as root, configure ASMLib:


- On each node, under the Oracle user add the following to the $HOME/.bashrc
file:
export ORACLE_SID=RACDB1 (Note: RACDB2 for node raclinux2)
export ORACLE_BASE=/home/oracle/product/10.2.0
export ORACLE_HOME=$ORACLE_BASE/db_1
export ORA_CRS_HOME=$ORACLE_BASE/crs
export LD_LIBRARY_PATH=$ORACLE_HOME/lib
export PATH=$ORACLE_HOME/bin:$ORA_CRS_HOME/bin:/bin:/usr/bin:/usr/sbin:/usr/local/bin:/usr/X11R6/bin
umask 022
Create ASM disks. On either node, as root execute:
/etc/init.d/oracleasm createdisk VOL1 /dev/sdf1
VIP Failover
I finally have my 10g RAC environment up
and running in a vmware environment. After a sigh of relief I checked the
environments status using crs_stat -t and noticed my VIP and a few other
services such as the database instance, asm instance and listener are down. Over
a period of time I noticed the VIP bouncing from node to node. It would failover
from node1 to node2 and after a period of time fail back from node2 to node1 and
in the process shutdown services dependent on it.
The VIP status check (handled by $ORA_CRS_BIN/racgvip) consists of 3 things, as I understand it.
1. On linux, the mii-tool is used to check the status of the Interface.
2. If check 1 fails, it pings the gateway via the interface it is checking.
3. If check 2 fails, the number of packets received by the interface is checked over a preset amount of time. Metalink says this is 2 seconds but I believe its 6 seconds.
If all 3 of these checks fail, it concludes the interface has failed and will initiate a VIP failover.
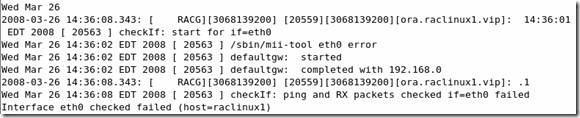
The first check fails in my environment. When mii-tool is executed on the command line I receive:
[root@raclinux1 /]#/sbin/mii-tool eth0
SIOCGMIIPHY on 'eth0' failed: Operation not supported
The mii-tool man page states this error is due to the fact the interface does not support MII queries.
The second check also fails in my environment. I am using private IP space for my vmware images and while at home I have a pingable gateway, at work I do not. The following note describes how to set FAIL_WHEN_DEFAULTGW_NOT_FOUND=0 in the $ORA_CRS_HOME/bin/racgvip script.
Subject: CRS-0215: Could not start resource 'ora..vip' Note:356535.1
However, this didn't work as I had expected. Even though my gateway isn't pingable, the VIP's would continue to failover. After looking at the script, the parameter FAIL_WHEN_DEFAULTGW_NOT_FOUND only applies if you don't have a gateway defined in your network setup. The racgvip script calls netstat to determine the gateway ip address. Since I have a gateway defined in case i'm experimenting from my home network, this parameter had no affect.
So that brings me to the last check. Before racgvip pings your gateway (check 2) it calls ifconfig and extracts the number of packets that your interface has received. Then it tries to ping your gateway. If the gateway doesn't respond or as in my case, not pingable, it calls ifconfig again and extracts the number of RX packets. If the number of RX packets hasn't changed, it concludes the interface has failed and initiates a VIP failover.
Even this check was failing in my environment. I edited the racgvip script to print out the number of RX packets each time it was checked. I noticed there wasn't much traffic during some of the checks and at times none, thus a failover was initiated. I believe this is due to a couple of factors. The first being that there is very little database activity since its a fresh install. The other is that I have a 2 node vmware cluster running on a 3 year old laptop, so at times it does freeze momentarily.
The solution to this problem is to extend the time between checks in the racgvip script. To do this, change the CHECK_TIMES variable from 2 to a higher value. I chose 20 but keep in mind, the higher you increase this value, the longer it will take for a failure to be detected.
If this was a proper RAC environment I don't believe I would have hit any of these issues. The benefit tho, is that now I have a better understanding of VIP failover.
The VIP status check (handled by $ORA_CRS_BIN/racgvip) consists of 3 things, as I understand it.
1. On linux, the mii-tool is used to check the status of the Interface.
2. If check 1 fails, it pings the gateway via the interface it is checking.
3. If check 2 fails, the number of packets received by the interface is checked over a preset amount of time. Metalink says this is 2 seconds but I believe its 6 seconds.
If all 3 of these checks fail, it concludes the interface has failed and will initiate a VIP failover.
The first check fails in my environment. When mii-tool is executed on the command line I receive:
[root@raclinux1 /]#/sbin/mii-tool eth0
SIOCGMIIPHY on 'eth0' failed: Operation not supported
The mii-tool man page states this error is due to the fact the interface does not support MII queries.
The second check also fails in my environment. I am using private IP space for my vmware images and while at home I have a pingable gateway, at work I do not. The following note describes how to set FAIL_WHEN_DEFAULTGW_NOT_FOUND=0 in the $ORA_CRS_HOME/bin/racgvip script.
Subject: CRS-0215: Could not start resource 'ora..vip' Note:356535.1
However, this didn't work as I had expected. Even though my gateway isn't pingable, the VIP's would continue to failover. After looking at the script, the parameter FAIL_WHEN_DEFAULTGW_NOT_FOUND only applies if you don't have a gateway defined in your network setup. The racgvip script calls netstat to determine the gateway ip address. Since I have a gateway defined in case i'm experimenting from my home network, this parameter had no affect.
So that brings me to the last check. Before racgvip pings your gateway (check 2) it calls ifconfig and extracts the number of packets that your interface has received. Then it tries to ping your gateway. If the gateway doesn't respond or as in my case, not pingable, it calls ifconfig again and extracts the number of RX packets. If the number of RX packets hasn't changed, it concludes the interface has failed and initiates a VIP failover.
Even this check was failing in my environment. I edited the racgvip script to print out the number of RX packets each time it was checked. I noticed there wasn't much traffic during some of the checks and at times none, thus a failover was initiated. I believe this is due to a couple of factors. The first being that there is very little database activity since its a fresh install. The other is that I have a 2 node vmware cluster running on a 3 year old laptop, so at times it does freeze momentarily.
The solution to this problem is to extend the time between checks in the racgvip script. To do this, change the CHECK_TIMES variable from 2 to a higher value. I chose 20 but keep in mind, the higher you increase this value, the longer it will take for a failure to be detected.
If this was a proper RAC environment I don't believe I would have hit any of these issues. The benefit tho, is that now I have a better understanding of VIP failover.
Over the past little while i've been
playing around with RAC on Vmware. Specifically 10.2.0.1 on Oracle Enterprise
Linux 5. Hopefully next week i'll be able to post the install steps but here are
a couple of pointers in case you are working on it now:
1. Randomly at least one, sometimes both of my vmware instances would hang. At the time of the hang I could see that they were both accessing shared disk, specifically the voting and ocr disks.
In my vmware.log file I could see the following error:
Msg_Post: Error Mar 12 16:47:25: vmx| [msg.log.error.unrecoverable] VMware Server unrecoverable error: (vmx) Mar 12 16:47:25: vmx| NOT_IMPLEMENTED
C:/ob/bora-56528/pompeii2005/bora/devices/scsi/scsiDisk.c:2874 bugNr=41568
I searched in vain for a solution and finally sent an email to the Oracle-L list. Thankfully Edgar saw my post and provided me with the solution. If your running on a slow computer (I didn't think my brand spanking new laptop was slow ;) you could have locking issues. In each of your vmware configuration files put the following line:
reslck.timeout="1200"
2. You should read the following notes before you start and modify your steps accordingly:
Subject: 10gR2 RAC Install issues on Oracle EL5 or RHEL5 or SLES10 (VIPCA Failures) Doc ID: Note:414163.1
Subject: VIPCA FAILS COMPLAINING THAT INTERFACE IS NOT PUBLIC Doc ID: Note:316583.1
If you are trying to install 10g on Oracle Enterprise Linux 5, as I am, you will hit errors installing clusterware. The first note above describes how a workaround used for a Linux threading bug is no longer valid. So before you run the root.sh script you will need to modify some files.
Note: The first time I installed clusterware I didn't see any errors. It was only when I verified the install I noticed something was wrong and found this note.
The second metalink article describes how vipca (which is executed automatically when you run root.sh during the clusterware install) doesn't like Private Network IP's being used for your public interface. It describes how to execute vipca manually.
I'm not 100% finished yet so I may encounter more issues. I have to recover from a backup and start my clusterware install again. While I was installing the database software my laptop BSOD'd and it corrupted my shared disks.
RAC Crash Recovery
In a normal oracle environment you can set
the FAST_START_MTTR_TARGET parameter which controls the amount of time (seconds)
required to recover from an instance or server failure. 10g has a new feature
Automatic Checkpoint tuning which utilizes periods of low I/O to advance
checkpoints. This feature requires that FAST_START_MTTR_TARGET is set to a
non-zero value.
FAST_START_MTTR_TARGET includes both instance startup and crash recovery. If you have a RAC environment and there is a failure the surviving instances will perform the recovery. Therefore including the instance startup time in the mean time to recover calculation isn't accurate. So in the case of RAC environments you may choose to set the _FAST_START_INSTANCE_RECOVERY_TARGET parameter which determines the amount of the time for instance recovery. Note: If multiple instances fail, recovery may take longer than the value you specified for this parameter.
So in summary, FAST_START_MTTR_TARGET includes the time for startup, mount, crash recovery, and open. _FAST_START_INSTANCE_RECOVERY_TARGET includes the time for instance recovery only.
Changing any parameter which affects checkpointing should be throughly tested to make sure you don't thrash your IO subsystem. Each of these parameters will increase I/O.
(TAF) Transparent Application Failover and testing
Part 4: (TAF) Transparent Application Failover and testing.
TAF, Transparent Application Failover is the ability for a connection to failover and reconnect to a surviving node. Transactions are rolled back but TAF can be configured to resume SELECT operations. Before you can use TAF you have to create a Service. Initially services were used for connection load balancing but over the years has developed into a method to distribute and manage workload across database instances. For more information on services see Oracles documentation:
http://www.oracle.com/technology/obe/10gr2_db_vmware/ha/rac/rac.htm
There are a few ways to create a service. You can use Grid Control, srvctl or dbca. For this exercise I am going to use DBCA.
Launch DBCA. Select Oracle Real Application Clusters database and click on next:
![clip_image002[1]](http://lh6.ggpht.com/david.best/SB4LgYDKWmI/AAAAAAAAAy0/TitvoVa4FqM/s1600-h/clip_image0021%5B1%5D.jpg)
Select Services Management and click on Next:
![clip_image004[1]](http://lh6.ggpht.com/david.best/SBzXa4DKWOI/AAAAAAAAAzA/6hv7mdza8PU/s1600-h/clip_image0041%5B4%5D.jpg)
RACDB should be selected, so click the Next button:
![clip_image006[1]](http://lh3.ggpht.com/david.best/SBzXcIDKWQI/AAAAAAAAAzI/PH5AMrCXf2A/s1600-h/clip_image0061%5B1%5D.jpg)
On the following screen click on the Add button. When prompted for a service name enter RAC and click on the OK button:
![clip_image008[1]](http://lh4.ggpht.com/david.best/SBzXdYDKWSI/AAAAAAAAAzQ/wI9a2hhT3C4/s1600-h/clip_image0081%5B1%5D.jpg)
On the following screen verify both RAC instances (RACDB1, RACDB2) have the preferred option selected. Preferred means that the service will run on that instance when the environment first starts. An instance flagged as available means it will not run the service unless the preferred instances fail. Since this is a RAC environment we want users to be distributed between both nodes, thus they need to have the preferred option set.
The TAF policy is the failover settings. Select Basic. Basic means that the session is reconnected when a node fails. Preconnect means that a shadow process is created on another node in the cluster, to reduce time if there is a failure.
![clip_image010[1]](http://lh5.ggpht.com/david.best/SBzXeoDKWUI/AAAAAAAAAzY/IBEZjnAvoH0/s1600-h/clip_image0101%5B1%5D.jpg)
Once the changes above have been completed, click on the finish button. A popup will appear prompting you to configure the services. Select OK.
![clip_image012[1]](http://lh6.ggpht.com/david.best/SBzXf4DKWWI/AAAAAAAAAzg/fT895UIUZRU/s1600-h/clip_image0121%5B1%5D.jpg)
![clip_image014[1]](http://lh4.ggpht.com/david.best/SBzXhYDKWYI/AAAAAAAAAzo/n1gpohtaMkE/s1600-h/clip_image0141%5B1%5D.jpg)
Once the service configuration has completed, you will be asked if you’d like to perform another operation. After you select No, dbca will close.
![clip_image016[1]](http://lh3.ggpht.com/david.best/SBzXjIDKWaI/AAAAAAAAAzw/k4oOl33WJ5I/s1600-h/clip_image0161%5B1%5D.jpg)
A check of the $ORACLE_HOME/network/admin/tnsnames.ora file will show the following new entry:
![clip_image018[1]](http://lh4.ggpht.com/david.best/SBzXkYDKWcI/AAAAAAAAA0g/Qy6J3IhAxZM/s1600-h/clip_image0181%5B6%5D.jpg)
Lets break down this new entry and highlight a few key lines:
Line 5: (LOAD_BALANCE = yes)
This line indicates that Oracle will randomly select one of the addresses defined on the previously two lines and connect to that nodes listener. This is called client-side connect-time load balancing.
Lines 9 -13: These lines are the TAF settings.
Line 10: (TYPE = SELECT)Testing TAF
There are two types of failover. SELECT indicates that the session will be authenticated on a surviving node but as well SELECT statements will be re-executed. Rows already returned to the client are ignored.
The other option is SESSION. In a SESSION failover, only the users session is re-authenticated.
Line 11: (METHOD = BASIC)
BASIC means that the session will not reconnect to a surviving node until the failover occurs.
PRECONNECT means a shadow process is created on a backup instance to reduce failover time. There are some additional considerations when choosing this setting so be sure to read up on it.
Line 12 and 13: (RETRIES = 180)
(DELAY = 5)
Self-explanatory, the maximum number of retries to failover and the amount of time in seconds to wait between attempts.
Session 1: Login to the database via the service created above:
![clip_image020[1]](http://lh3.ggpht.com/david.best/SBzXlIDKWeI/AAAAAAAAA0o/EpP9-L54c5Q/s1600-h/clip_image0201%5B2%5D.jpg)
Session 2: Login as sysdba and query gv$session to determine which instance Scott is connected to:
![clip_image022[1]](http://lh6.ggpht.com/david.best/SBzXl4DKWgI/AAAAAAAAA0w/4QHZMD-vNRQ/s1600-h/clip_image0221%5B2%5D.jpg)
Scott is connected to instance 2 (which resides on raclinux2), so lets shutdown that instance and see what happens. As sysdba, connect to RACDB2 and shutdown immediate. Once the instance has shutdown re-execute the query above to see which instance Scott is now connected to:
![clip_image024[1]](http://lh5.ggpht.com/david.best/SBzXmoDKWiI/AAAAAAAAA04/vegVfy9XStU/s1600-h/clip_image0241%5B2%5D.jpg)
Why hasn’t the session failed over? Because when node 2 was shutdown scott wasn’t executing a query. Re-execute the select count(*) from emp statement, then query gv$session again:
![clip_image026[1]](http://lh6.ggpht.com/david.best/SBzXn4DKWkI/AAAAAAAAA1A/AnhOoMl-B68/s1600-h/clip_image0261%5B2%5D.jpg)
If a session is inactive, it will not failover until another statement is issued.
Part 3 - Issues and Resolutions
The following is a list of the issues and solutions for the problems I
encountered while installing 10gR2 RAC , OEL5 on VMware. Some of the items below
are things I tried but didn't resolve an issue but I thought might be
interesting.
1. If you are using vmware on a slow computer, especially when 2 nodes are running, you may experience locking issues. If so, it could be timeouts for the shared disk. In your vmware config files add the following:
reslck.timeout="1200"
On the bottom right hand side of your vmware window you will see disk icons that will flash green when they are in use. If vmware hangs and any of the shared disks are green then this is probably the issue.
2. Eth0 has to be bridged or you will see the following running vipca or in your vip log:
Interface eth0 checked failed (host=raclinux1)
Invalid parameters, or failed to bring up VIP (host=raclinux1)
3. If during the install you didn’t disable the firewall, root.sh will be unable to start on the second node, raclinux2. If so, disable iptables by executing:
/sbin/service iptables stop
To disable this feature from starting after a reboot, execute the following as root:
/usr/sbin/system-config-services
Scroll down until you see iptables, if it is checked, remove the check then click on the save button. You can also stop the services from this program as well by highlighting iptables and clicking the stop button.
Subject: Root.sh Unable To Start CRS On Second Node Doc ID: Note:369699.1
4. The following two workarounds are already addressed in the installation guide but here they are for reference.
Subject: VIPCA FAILS COMPLAINING THAT INTERFACE IS NOT PUBLIC Doc ID: Note:316583.1 Subject: 10gR2 RAC Install issues on Oracle EL5 or RHEL5 or SLES10 (VIPCA Failures) Doc ID: Note:414163.1
5. Subject: CRS-0215: Could not start resource 'ora..vip' Doc ID: Note:356535.1 During a VIP status check, your public interfaces gateway is pinged. If you don't have a gateway specified, this check will fail. If that action fails it assumes there is a problem with the Ethernet adapter interface. To resolve this, change the parameter FAIL_WHEN_DEFAULTGW_NOT_FOUND in the $ORA_CRS_HOME/bin/racgvip and set it to 0
This doesn’t mean the VIP will failover, there are some additional checks. Also, the parameter FAIL_WHEN_DEFAULTGW_NOT_FOUND only applies if you don't have a gateway defined in your network setup. If you entered a gateway ip address as per my guide, even tho it may not be pingable, this will have no effect.
6. While troubleshooting VIP failovers I found the following note which details how to increase the timeouts for the VIP service. This didn’t solve any of the issues I encountered but I thought it may be interesting to note:
Subject: ASM Instance Shuts Down Cleanly On Its Own Doc ID: Note:277274.1
7. If you are using vmware on a slow computer you may experience a problem where the VIP’s failover frequently. If that happens you may want to set the following:
Increasing the value of the parameter CHECK_TIMES to 10 may help in this case.
In $ORA_CRS_HOME/bin/racgvip set the following line:
# number of time to check to determine if the interface is down
CHECK_TIMES=10
NOTE: This will only help when the problem is because of slow response from the gateway. Please do NOT use this workaround in other situations. This will have sideaffect of increasing the time to detect a unresponsive public interface.
Subject: VIP Going Offline Intermittantly - Slow Response from Default Gateway Doc ID: Note:399213.1
8. CRS services in an unknown state after reboot. Watching the crs logs I noticed the services weren’t waiting for the appropriate timeout value before erroring. This is a bug with 10.2.0.1 CRS:
Patch 4698419
[10201-050630.0024A_LINUX64]STARTING CRS RESOURCES FAILS WITHOUT WAITING TIMEOUT
1. If you are using vmware on a slow computer, especially when 2 nodes are running, you may experience locking issues. If so, it could be timeouts for the shared disk. In your vmware config files add the following:
reslck.timeout="1200"
On the bottom right hand side of your vmware window you will see disk icons that will flash green when they are in use. If vmware hangs and any of the shared disks are green then this is probably the issue.
2. Eth0 has to be bridged or you will see the following running vipca or in your vip log:
Interface eth0 checked failed (host=raclinux1)
Invalid parameters, or failed to bring up VIP (host=raclinux1)
3. If during the install you didn’t disable the firewall, root.sh will be unable to start on the second node, raclinux2. If so, disable iptables by executing:
/sbin/service iptables stop
To disable this feature from starting after a reboot, execute the following as root:
/usr/sbin/system-config-services
Scroll down until you see iptables, if it is checked, remove the check then click on the save button. You can also stop the services from this program as well by highlighting iptables and clicking the stop button.
Subject: Root.sh Unable To Start CRS On Second Node Doc ID: Note:369699.1
4. The following two workarounds are already addressed in the installation guide but here they are for reference.
Subject: VIPCA FAILS COMPLAINING THAT INTERFACE IS NOT PUBLIC Doc ID: Note:316583.1 Subject: 10gR2 RAC Install issues on Oracle EL5 or RHEL5 or SLES10 (VIPCA Failures) Doc ID: Note:414163.1
5. Subject: CRS-0215: Could not start resource 'ora..vip' Doc ID: Note:356535.1 During a VIP status check, your public interfaces gateway is pinged. If you don't have a gateway specified, this check will fail. If that action fails it assumes there is a problem with the Ethernet adapter interface. To resolve this, change the parameter FAIL_WHEN_DEFAULTGW_NOT_FOUND in the $ORA_CRS_HOME/bin/racgvip and set it to 0

This doesn’t mean the VIP will failover, there are some additional checks. Also, the parameter FAIL_WHEN_DEFAULTGW_NOT_FOUND only applies if you don't have a gateway defined in your network setup. If you entered a gateway ip address as per my guide, even tho it may not be pingable, this will have no effect.
6. While troubleshooting VIP failovers I found the following note which details how to increase the timeouts for the VIP service. This didn’t solve any of the issues I encountered but I thought it may be interesting to note:
Subject: ASM Instance Shuts Down Cleanly On Its Own Doc ID: Note:277274.1
7. If you are using vmware on a slow computer you may experience a problem where the VIP’s failover frequently. If that happens you may want to set the following:
Increasing the value of the parameter CHECK_TIMES to 10 may help in this case.
In $ORA_CRS_HOME/bin/racgvip set the following line:
# number of time to check to determine if the interface is down
CHECK_TIMES=2
-- to --# number of time to check to determine if the interface is down
CHECK_TIMES=10
NOTE: This will only help when the problem is because of slow response from the gateway. Please do NOT use this workaround in other situations. This will have sideaffect of increasing the time to detect a unresponsive public interface.
Subject: VIP Going Offline Intermittantly - Slow Response from Default Gateway Doc ID: Note:399213.1
8. CRS services in an unknown state after reboot. Watching the crs logs I noticed the services weren’t waiting for the appropriate timeout value before erroring. This is a bug with 10.2.0.1 CRS:
Patch 4698419
[10201-050630.0024A_LINUX64]STARTING CRS RESOURCES FAILS WITHOUT WAITING TIMEOUT
Part 2 – Installing OCR, ASM and Database
Pre-Req: Download and obtain 10.2.0.1 clusterware and 10.2.0.1 database from Technet.
- Install CVUQDISK package.
Unzip the clusterware software and cd to ./clusterware/rpm directory. Run the following commands on both nodes:
[root@raclinux1 ~] export CVUQDISK_GRP=dba
[root@raclinux1 ~] rpm –iv cvuqdisk-1.0.1-1.rpm
Preparing packages for installation…
cvuqdisk-1.0.1-1
- Clusterware Install
Change directory to/clusterware and execute:
runInstaller -ignoreSysPreReqs
Specify the inventory location and group name: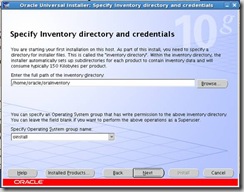
Specify the Home details:
Ignore warnings on the Prerequisite checks screen below. At the time 10.2.0.1 was released Oracle Enterprise Linux didn’t exist, so the installer doesn’t view it as a supported OS.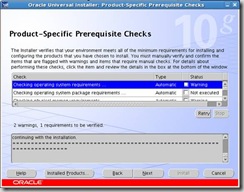
Cluster Configuration. Click on Add and fill in the information for the second node, raclinux2 as per the screenshot below: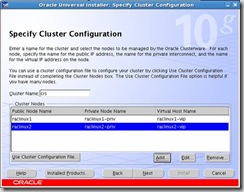
Private Interconnect Enforcement… Select eth0, click the Edit button and select public for the interface type since it is the primary network card: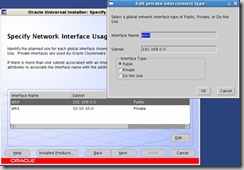
Oracle Custer Registry (OCR) location. These have been mounted as /dev/raw/raw3 and /dev/raw/raw4: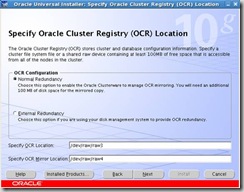
Voting Disk Locations: These have been mounted as /dev/raw/raw1, /dev/raw/raw2 and /dev/raw/raw6:
Click Install on the Summary screen: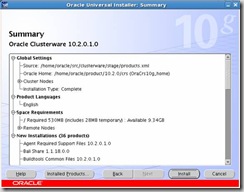
Once the install has completed you will be prompted to execute the following scripts on both nodes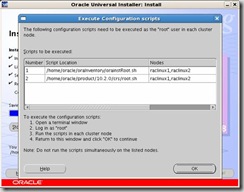
The CRS Home root.sh script executes the ocrconfig (Oracle Cluster Registry Configuration Tool) and clscfg (Cluster Configuration tool). These scripts format the voting disks, startup the software and add the daemons to the inittab (OS startup scripts).
Before executing root.sh, for both nodes, edit the vipca and srvctl files under the CRS bin directory. Search for the string LD_ASSUME_KERNEL and find the line where this variable is set. Unset the variable by placing the following on the next line:
unset LD_ASSUME_KERNEL
Set Note: 414163.1 for details.
Execute root.sh. (Note: don’t return to the runInstaller and click OK signifying the root.sh script has finished until directed to do in a few steps.) Towards the end of the root.sh on raclinux2 output you will see the following error:Error 0(Native: listNetInterfaces:[3])[Error 0(Native: listNetInterfaces:[3])]
As per the same note above, on raclinux2 execute the following from the CRS bin directory as root:
./oifcfg setif –global eth0/192.168.0.0:public
./oifcfg setif –global eth1/10.10.10.0:cluster_interconnect
From the same directory launch vipca on raclinux2:
On the following screen enter the following information in the screenshot. When you put the IP Alias Name in, the IP Address column will auto populate: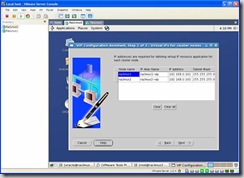
A Summary screen is show, on which you click on the Finish button: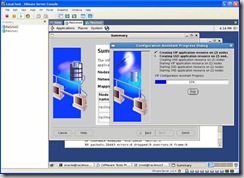
Once the config finishes you should see configuration results screen: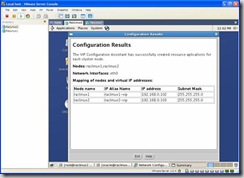
From a command window, as oracle execute crs_stat –t from the Cluster Home bin directory and you should see that all services are online: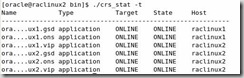
Now, go back to raclinux1 and click OK that you have finished executing root.sh on both nodes. The following screen will appear and once each of the tools successfully complete click on next: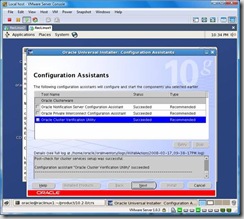
The installation is now complete and you can click on Exit: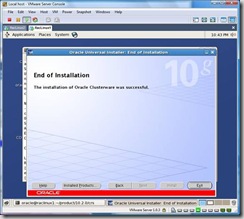
- Install ASM.
Unzip the database 10.2.0 archive and launch:
runInstaller -ignoreSysPrereqs
Select Enterprise Edition and click on next:
Change the Oracle Home name and path to reflect this is an ASM install:
The runInstaller will detect the cluster, so make sure raclinux2 is checked in the following screen: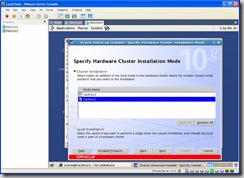
There will be some warnings in the Prerequisite check screen, these can be ignored for the same reason as the OCR install: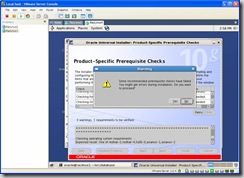
Since we are performing an ASM install, select the Configure Automatic Storage Management (ASM) option and enter a password for the sys account: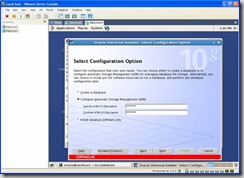
Configure ASM Storage: Since we are using ASMLib you should see the VOL1 you created earlier in the following screen. Select External Redundancy and the ORCL:VOL1 disk: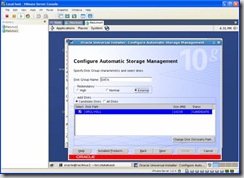
Finally, click the install button: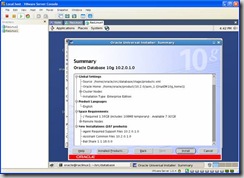
After the install you’ll be prompted to execute the root.sh scripts on both nodes. After which click on the OK button.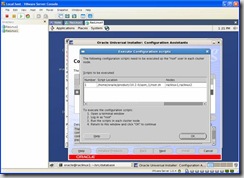
Installation is now complete and you can click on exit: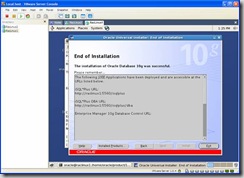
- Install Database Software. From the database software staging
directory launch:
runInstaller –ignoreSysPreReqs
When prompted for Installation Type, select Enterprise edition and click on Next: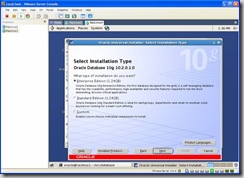
Verify Home Details: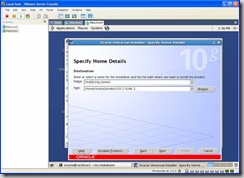
Make sure both nodes are selected in the Cluster Installation Screen:
Ignore warnings and click on Yes then on the next button: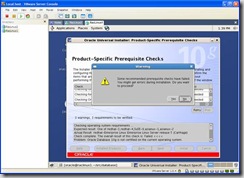
In the Select configuration Option screen select install database Software only:
Review the Summary Screen and click on Install:
Once the installation is complete you will be shown the following screen, click on Exit: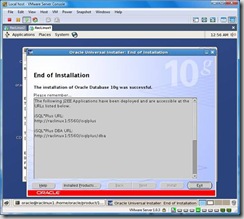
- Install agent. Note: This assumes you already have grid
control or access to a Grid Control installation. If you do not, then you can
skip this step and manage the environment using Database Control. Download a
copy of Enterprise manager and from raclinux1 launch the runInstaller:
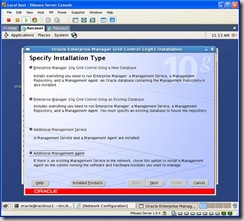
If you selected the Mass Agent download from OTN the only option available and preselected is “Additional Management Agent”. Click next and in the following screen modify the Parent Directory to: /home/oracle/product/10.2.0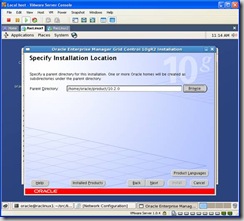
Since this is a clustered environment you will be prompted for a cluster or local install. Select cluster and verify both nodes are selected, and then click next.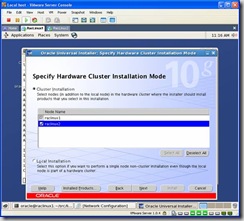
Select the location of an existing Grid Control Install: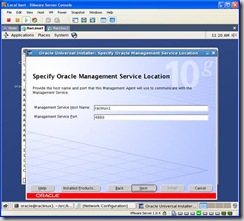
Click next and again on the next screen, ignore Oracle Configuration Manager Registration. On the last screen, review the summary and click on Install: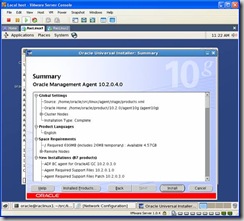
Installing: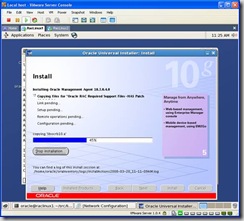
When prompted, execute the root.sh script on each node, and in the correct order: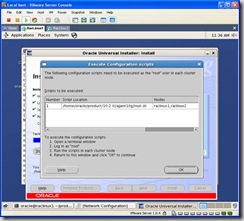
After the installation, click exit: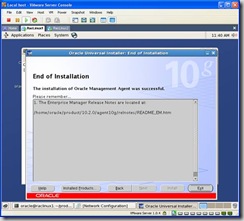
- Creating the cluster database.
Change to the $ORACLE_HOME/bin directory and launch dbca. Select the option to create an Oracle Real Application Clusters database: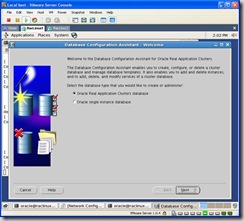
Select Create a Database: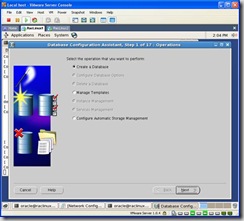
Click on the Select All button to make sure both nodes are highlighted: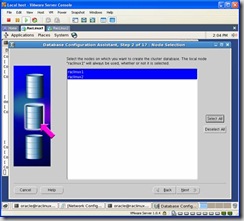
Select the general purpose template: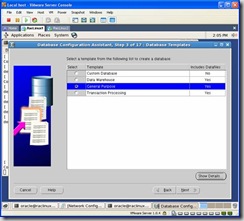
For the global database name and sid, enter RACDB: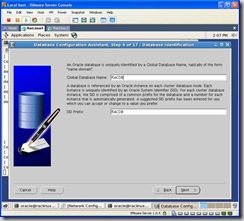
Select your grid control location in the following window. If you installed the agent earlier it will be automatically selected. If not, Use Database Control will be selected. Click next:
Choose a password: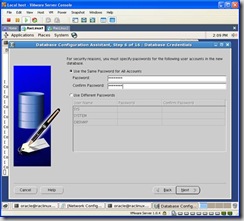
Under storage options choose ASM: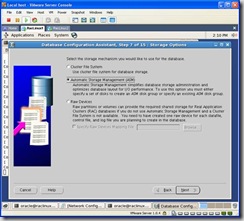
You’ll be promoted for the ASM sys password: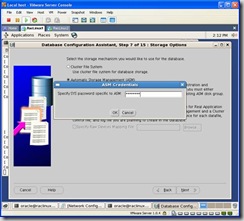
Select the DATA Disk Group: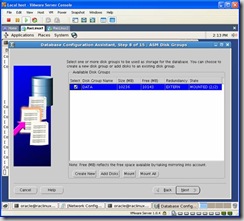
Select Oracle-Managed Files: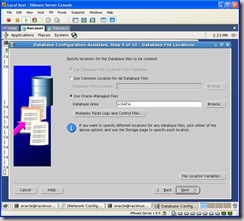
I didn’t create a second disk group for a flash back recovery area, so just click next on the following screen: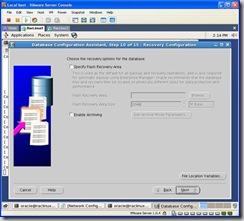
Choose the sample schemas so you have some data to play with: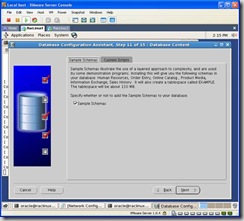
You can create services now if you’d like or later via dbca or srvctl: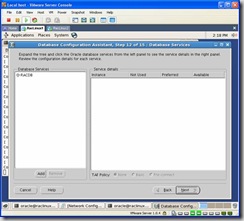
You can customize the initialization parameters to your liking. I choose a custom SGA with 200 for the SGA and 25MB for the PGA. The rest were defaults: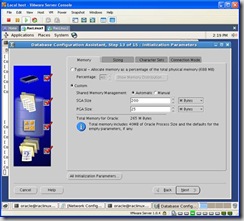
In the Database Storage window click on next: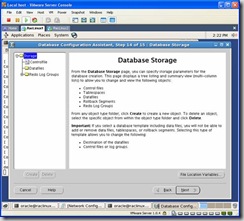
Finally, click finish to start the creation process: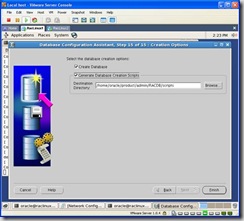
After you click the Finish button you will be prompted with a summary screen. You should review it to make sure everything looks fine then click on ok: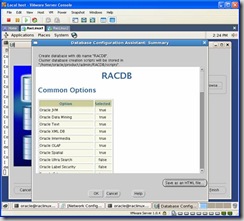
If you selected the Generate Database Creation Script option, they will be generated first. Once it completes a popup will appear letting you know it was successful. After that click OK, you will be returned to the previous screen and click finish again: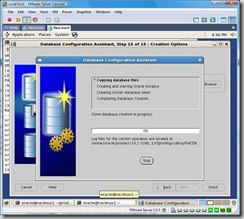
Once the install completes you will be presented with a screen similar to the one below:


Subscribe to:
Posts (Atom)