Hi All,
In this post i am going to show you Oracle 19C database 2 node RAC installation .
Note : Installation of VM and OEL go through this video
https://www.youtube.com/watch?v=PPq2bM8Oymg&t=9s
after OEM 7.* install , do the follow steps :
1. update the yum repository and then update the pre-requisites for oracle 19C database and ASM.
yum update -y
yum install -y oracle-database-preinstall-19c
yum install -y oracleasm-support
yum install -y bind
yum install -y clu*
Now , configure VMbox tools ..
- devices .. > insert Guest Additional CD Image....
enable the screen resolution and font size .. etc ..
after that restart the Linux Machine.
init 6
Update the below configuration :
cat /etc/sysctl.conf
cat /etc/selinux/config
SELINUX=disabled
Ping should be work also add the host file names in /etc/hosts
groups creation :
groupadd -g 5001 oinstall
groupadd -g 5002 dba
groupadd -g 5003 oper
groupadd -g 5004 asmadmin
groupadd -g 5005 asmdba
groupadd -g 5006 asmoper
user creation :
useradd -u 5007 -g oinstall -G dba,oper,asmdba oracle
useradd -u 5008 -g oinstall -G asmadmin,asmdba,asmoper,dba grid
In this screen some of the groups and oracle user already exist so we are seeing that error as well. those are created automatically at the time of 19C database pre-requisites rpm installation .
[root@racs1 ~]# id grid
uid=5008(grid) gid=54321(oinstall) groups=54321(oinstall),54322(dba),5004(asmadmin),5005(asmdba),5006(asmoper)
[root@racs1 ~]# id oracle
uid=54321(oracle) gid=54321(oinstall) groups=54321(oinstall),54322(dba),54323(oper),54324(backupdba),54325(dgdba),54326(kmdba),54330(racdba)
[root@racs1 ~]#
Change the password for oracle and grid users
passwd oracle
passwd grid
Create the directories in which the Grid and Oracle database software will be installed.
mkdir -p /u01/app/oracle
mkdir -p /u01/app/oracle/product/19.0.0/db_home
mkdir -p /u02/app/grid_base
mkdir -p /u02/app/19.0.0/grid_home
mkdir -p /u02/app/oraInventory
chown -Rf grid:oinstall /u02
chown -Rf oracle:oinstall /u01
chmod -Rf 775 /u01
chmod -Rf 775 /u02
Configure Bash Profile of Grid and Oracle Users.
create .bash_profiles for grid
# Oracle Settings
export TMP=/tmp
export TMPDIR=$TMP
export ORACLE_BASE=/u02/app/grid_bas
export ORACLE_HOME=/u02/app/19.0.0/grid_home
export ORACLE_SID=+ASM1
export ORACLE_TERM=xterm
export BASE_PATH=/usr/sbin:$PATH
export PATH=$ORACLE_HOME/bin:$BASE_PATH
export LD_LIBRARY_PATH=$ORACLE_HOME/lib:/lib:/usr/lib
export CLASSPATH=$ORACLE_HOME/JRE:$ORACLE_HOME/jlib:$ORACLE_HOME/rdbms/jlib
:wq!
. .bash_profiles
Stop and Disable Firewall - in real time we will re-open the firewall post installation's
====================
systemctl stop firewalld.service
systemctl disable firewalld.service
NTP Configuration
===========================================
systemctl enable chronyd.service
systemctl restart chronyd.service
check the status for NTP : status code 200 is okay
chronyc -a 'burst 4/4'
chronyc -a makestep
==========================================
Start DNS configuration :::
====================================
we have installed the bind packages , cross check
Then Edit the Configuration of name server
take the backup of original one .. then update the red marked values as per your IP.
cp /etc/named.conf /etc/named.conf_bkp
vi /etc/named.conf_bkp
options {
listen-on port 53 { 127.0.0.1; 192.168.56.71; };
listen-on-v6 port 53 { ::1; };
directory "/var/named";
dump-file "/var/named/data/cache_dump.db";
statistics-file "/var/named/data/named_stats.txt";
memstatistics-file "/var/named/data/named_mem_stats.txt";
recursing-file "/var/named/data/named.recursing";
secroots-file "/var/named/data/named.secroots";
allow-query { localhost; 192.168.56.0/24; };
zone "localdomain.com" IN {
type master;
file "localdomain.zone";
allow-update { none; };
};
zone "56.168.192.in-addr.arpa." IN {
type master;
file "56.168.192.in-addr.arpa";
allow-update { none; };
};
Create the Forward and Reserve Zone files as mentioned in named.conf
FORWARD ZONE :
create a forward zone :
cp /var/named/named.localhost /var/named/localdomain.zone
vi /var/named/localdomain.zone
$TTL 86400
@ IN SOA racs1.localdomain.com. root.localdomain.com. (
2014051001 ; serial
3600 ; refresh
1800 ; retry
604800 ; expire
86400 ; minimum
)
@ IN NS racs1.localdomain.
localhost IN A 127.0.0.1
racs1 IN A 192.168.56.71
racs2 IN A 192.168.56.72
racs1-priv IN A 192.168.10.1
racs2-priv IN A 192.168.10.2
racs1-vip IN A 192.168.56.81
racs2-vip IN A 192.168.56.82
racs-scan IN A 192.168.56.91
racs-scan IN A 192.168.56.92
Create a reserve zone :
cp /var/named/named.loopback /var/named/56.168.192.in-addr.arpa
vi /var/named/56.168.192.in-addr.arpa
$TTL 86400
@ IN SOA racs1.localdomain.com. root.localdomain.com. (
2
3H
1H
1W
1H )
@ IN NS racs1.localdomain.com.
@ IN PTR localdomain.com.
racs1 IN A 192.168.56.71
racs-scan IN A 192.168.56.91
racs-scan IN A 192.168.56.92
racs-scan IN A 192.168.56.93
71 IN PTR racs1.localdomain.com.
91 IN PTR racs-scan.localdomain.
92 IN PTR racs-scan.localdomain.
93 IN PTR racs-scan.localdomain.
note : restorecon /etc/named.conf if any changes in the named.conf do this
check the DNS status and start :
systemctl status named.service
systemctl start named.service
Change the Group to named from root :
iptables -A INPUT -i lo -j ACCEPT
add resolv.conf
# Generated by NetworkManager
search localdomain.com.
nameserver 192.168.56.71
nameserver 192.168.56.72
options timeout:1
options attempts:5
nslookup racs-scan .
shut down the Node1 RACS ... then prepare the Node2
Taking the backup of my Node1 ... to build the node2 ..
Click on the File ...> Export Appliance ....
select the Machin and click next
select the location for this backup and click on next
Click on Finish
wait for some time that will take some time 10 to 15 mins .. depends on system speed.
ASM DISK Group Setup :
after taking the backup of your node1 , create disks for ASM Storage ..
Node1 : Racs1
Click on General > Storage > Click on hard disk as mentioned in the snap..
click on Create and select VDI then click on next
Click on next .. keep all values default
select the path , i have created 2 folders for racs1 and racs2 .. for Storage i have created in the Dir... give 25G and create OCR disk group
create second and 3rd groups .. DATA and ARCH
choose those 3 disk to storage SATA :
Now we will prepare the Node2 : from the node1 backup.
Click on the File and Import Appliance ..
Restore the node1 backup which we taken before :
Click on Next ..
Change the name and path for the Node2 hostname : racs2 , path also select where we installed node1 . there we have created one more dir name with : racs2
We can now able to see the node2 machine : racs2
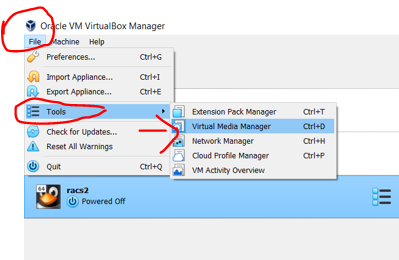
Now we can create the shared disk and we will add those shared disks with node2 storage :
select file from the VM .. > tools ..> select Virtual media manager ..>
Select the disks one by one and type : sharable and click apply .. repeat the same for all 3 disks : DATA , OCR and ARCH
you will get release popup click on release
select node2 and add those disk to that node :
General >>>> Storage >>> Hard disk >>> select the DATA and OCR Disks ..
add to node2 :
start the node2 and change the hostname and network interfaces ... IP'/s
Change Hostname : from racs1 to racs2
nmcli general hostname
nmcli general hostname racs2.localdomain
nmcli general hostname
service systemd-hostnamed restart
Change Network
Select Applications and settings
then update IP's for node2 :
after the run this
systemctl restart network
init 6 .. restart the node2 and node1 .
systemctl start named.service
Node1 :
unzip the oracle 19c grid and oracle software from the shared folder Only One NODE1 ...
cd /media/sf_VM_Softwares/19C_DB_Linux_7.8-SW/19C-Grid_sw
Grid Software :
unzip V982068-01.zip -d /u02/app/19.0.0/grid_home/
Oracle Software Unzip :
[root@racs1 19C_Database]# pwd
/media/sf_VM_Softwares/19C_DB_Linux_7.8-SW/19C_Database
[root@racs1 19C_Database]# ls
V982063-01.zip
[root@racs1 19C_Database]# unzip V982063-01.zip -d /u01/app/oracle/product/19.0.0/db_home/
Install the package cvudisk from the grid home as the “root” user on all nodes.
[root@racs1 19C_Database]# cd /u02/app/19.0.0/grid_home/cv/rpm/
[root@racs1 rpm]# ls
cvuqdisk-1.0.10-1.rpm
[root@racs1 rpm]# pwd
/u02/app/19.0.0/grid_home/cv/rpm
[root@racs1 rpm]# rpm -Uvh cvuqdisk*
Preparing... ################################# [100%]
Using default group oinstall to install package
Updating / installing...
1:cvuqdisk-1.0.10-1 ################################# [100%]
[root@racs1 rpm]#
COPY to Node2 ;
[root@racs1 rpm]# scp ./cvuqdisk* root@racs2:/tmp
The authenticity of host 'racs2 (192.168.56.72)' can't be established.
ECDSA key fingerprint is SHA256:xVUuoM0gg6tKwCZBarK0Cgw8+VmJgnXJFZDFNRTddK8.
ECDSA key fingerprint is MD5:2a:93:93:7a:f1:93:e9:79:65:16:fc:96:ac:aa:a9:04.
Are you sure you want to continue connecting (yes/no)? yes
Warning: Permanently added 'racs2,192.168.56.72' (ECDSA) to the list of known hosts.
root@racs2's password:
cvuqdisk-1.0.10-1.rpm 100% 11KB 11.0MB/s 00:00
[root@racs1 rpm]#
Configure Oracle ASM : lsblk
fdisk /dev/sdb .. similarly we need to do all
fdisk /dev/sdc
fdisk /dev/sdd
fdisk /dev/sde
fdisk /dev/sdf
all partitions are done ..
Configure oracleasm utility. provide gird user and group oinstall.
Initialize the asmlib with the oracleasm init command to load oracleasm module and mount the oracleasm filesystem:-
When ASMLIB is configured, a special file system is created and mounted as /dev/oracleasm, you should notice the following line from the df command:-
oracleasm configure
oracleasm configure -i >>> grid oinstall y y
oracleasm init
oracleasm createdisk OCR /dev/sdd1
oracleasm createdisk DATA /dev/sde1
oracleasm createdisk ARCHIVE /dev/sdf1
oracleasm scandisks
oracleasm listdisks
NODE 2 : oracleasm configure
oracleasm configure -i
oracleasm init
note : disk creation not required on node2
oracleasm scandisks
oracleasm listdisks
Password less connection : Grid user :
./sshUserSetup.sh -user grid -hosts "racs1 racs2" -noPromptPassphrase -confirm -advanced
./sshUserSetup.sh -user oracle -hosts "racs1 racs2" -noPromptPassphrase -confirm -advanced
Pre-check for RAC Setup
Pre-check for CRS installation using Cluvfy
We use this Cluvfy command to check that our cluster is ready for the Grid install.
[grid@racs1 grid]$ ./runcluvfy.sh stage -pre crsinst -n racs1,racs2 -verbose
Display Config and Start Grid Installation
export DISPLAY
[root@racs1 ~]# su - grid
Last login: Sat Aug 12 00:35:11 IST 2023 on pts/1
[grid@racs1 ~]$ cd $ORACLE_HOME
[grid@racs1 grid_home]$ pwd
/u02/app/19.0.0/grid_home
[grid@racs1 grid_home]$ ./gridSetup.sh
Direct login with Grid user :
Select the Configure Oracle Grid Infrastructure for a New Cluster option, then click the Next button.
Accept the Configure an Oracle Standalone Cluster option by clicking the Next button.
Enter the cluster name racs-cluster, SCAN name racs-scan and SCAN port 1521, then click the Next button.
On the “Cluster Node Information” screen, click the Add button. Enter the details of the second node in the cluster, then click the OK button.
Click the SSH connectivity button and enter the password for the oracle user. Click the Setup button to configure SSH connectivity, and the Test button to test it once it is complete. Once the test is complete, click the Next button.
Check the public and private networks are specified correctly as ASM & Private. Click the Next button.
Accept the Use Oracle Flex ASM for Storage option by clicking the Next button.
Select the No option, as we don’t want to create a separate disk group for the GIMR in this case. Click the Next button.
First Browse the path /dev/oracleasm/disks* using change discovery path
Set the redundancy to External, click the 12GB DISK for OCR configuration, then click the Next button.
Enter the credentials and click the Next button.
Accept the default IPMI option by clicking the Next button.
un-select EM. Click the Next button. Default value
Set the groups to oinstall and click the Next button. Accept the warnings on the subsequent dialog by clicking the Yes button.
Click the Next button.
Accept the default inventory directory by click the Next button
Default : we will provide run the root.sh manually
pre-requisite checks : check and fixup
[root@racs1 grid]# /tmp/GridSetupActions2023-08-12_00-37-28AM/CVU_19.0.0.0.0_grid/runfixup.sh
All Fix-up operations were completed successfully.
[root@racs1 grid]#
[root@racs2 ~]# /tmp/GridSetupActions2023-08-12_00-37-28AM/CVU_19.0.0.0.0_grid/runfixup.sh
All Fix-up operations were completed successfully.
[root@racs2 ~]#
Check the Ignore All checkbox and click the Next button.
Double check and click the Install button.
When prompted, run the configuration scripts on each node one by one
Node1 :
[root@racs1 grid]# /u02/app/oraInventory/orainstRoot.sh
Changing permissions of /u02/app/oraInventory.
Adding read,write permissions for group.
Removing read,write,execute permissions for world.
Changing groupname of /u02/app/oraInventory to oinstall.
The execution of the script is complete.
[root@racs1 grid]#
Node2 :
[root@racs2 ~]# /u02/app/oraInventory/orainstRoot.sh
Changing permissions of /u02/app/oraInventory.
Adding read,write permissions for group.
Removing read,write,execute permissions for world.
Changing groupname of /u02/app/oraInventory to oinstall.
The execution of the script is complete.
[root@racs2 ~]#
Node1 :
/u02/app/19.0.0/grid_home/root.sh
[root@racs1 grid]# /u02/app/19.0.0/grid_home/root.sh
Performing root user operation.
The following environment variables are set as:
ORACLE_OWNER= grid
ORACLE_HOME= /u02/app/19.0.0/grid_home
Enter the full pathname of the local bin directory: [/usr/local/bin]:
Copying dbhome to /usr/local/bin ...
Copying oraenv to /usr/local/bin ...
Copying coraenv to /usr/local/bin ...
Creating /etc/oratab file...
Entries will be added to the /etc/oratab file as needed by
Database Configuration Assistant when a database is created
Finished running generic part of root script.
Now product-specific root actions will be performed.
Relinking oracle with rac_on option
Using configuration parameter file: /u02/app/19.0.0/grid_home/crs/install/crsconfig_params
The log of current session can be found at:
/u02/app/grid_base/crsdata/racs1/crsconfig/rootcrs_racs1_2023-08-12_01-06-25AM.log
2023/08/12 01:06:33 CLSRSC-594: Executing installation step 1 of 19: 'SetupTFA'.
2023/08/12 01:06:33 CLSRSC-594: Executing installation step 2 of 19: 'ValidateEnv'.
2023/08/12 01:06:33 CLSRSC-363: User ignored prerequisites during installation
2023/08/12 01:06:33 CLSRSC-594: Executing installation step 3 of 19: 'CheckFirstNode'.
2023/08/12 01:06:35 CLSRSC-594: Executing installation step 4 of 19: 'GenSiteGUIDs'.
2023/08/12 01:06:35 CLSRSC-594: Executing installation step 5 of 19: 'SetupOSD'.
2023/08/12 01:06:35 CLSRSC-594: Executing installation step 6 of 19: 'CheckCRSConfig'.
2023/08/12 01:06:35 CLSRSC-594: Executing installation step 7 of 19: 'SetupLocalGPNP'.
2023/08/12 01:07:01 CLSRSC-594: Executing installation step 8 of 19: 'CreateRootCert'.
2023/08/12 01:07:04 CLSRSC-4002: Successfully installed Oracle Trace File Analyzer (TFA) Collector.
2023/08/12 01:07:05 CLSRSC-594: Executing installation step 9 of 19: 'ConfigOLR'.
2023/08/12 01:07:17 CLSRSC-594: Executing installation step 10 of 19: 'ConfigCHMOS'.
2023/08/12 01:07:17 CLSRSC-594: Executing installation step 11 of 19: 'CreateOHASD'.
2023/08/12 01:07:20 CLSRSC-594: Executing installation step 12 of 19: 'ConfigOHASD'.
2023/08/12 01:07:21 CLSRSC-330: Adding Clusterware entries to file 'oracle-ohasd.service'
2023/08/12 01:07:41 CLSRSC-594: Executing installation step 13 of 19: 'InstallAFD'.
2023/08/12 01:07:45 CLSRSC-594: Executing installation step 14 of 19: 'InstallACFS'.
2023/08/12 01:07:49 CLSRSC-594: Executing installation step 15 of 19: 'InstallKA'.
2023/08/12 01:07:52 CLSRSC-594: Executing installation step 16 of 19: 'InitConfig'.
ASM has been created and started successfully.
[DBT-30001] Disk groups created successfully. Check /u02/app/grid_base/cfgtoollogs/asmca/asmca-230812AM010824.log for details.
2023/08/12 01:09:15 CLSRSC-482: Running command: '/u02/app/19.0.0/grid_home/bin/ocrconfig -upgrade grid oinstall'
CRS-4256: Updating the profile
Successful addition of voting disk ee7cb7b9f44d4f42bfdf89d857c09909.
Successfully replaced voting disk group with +OCR.
CRS-4256: Updating the profile
CRS-4266: Voting file(s) successfully replaced
## STATE File Universal Id File Name Disk group
-- ----- ----------------- --------- ---------
1. ONLINE ee7cb7b9f44d4f42bfdf89d857c09909 (/dev/oracleasm/disks/OCR) [OCR]
Located 1 voting disk(s).
2023/08/12 01:10:31 CLSRSC-594: Executing installation step 17 of 19: 'StartCluster'.
2023/08/12 01:11:33 CLSRSC-343: Successfully started Oracle Clusterware stack
2023/08/12 01:11:33 CLSRSC-594: Executing installation step 18 of 19: 'ConfigNode'.
2023/08/12 01:12:47 CLSRSC-594: Executing installation step 19 of 19: 'PostConfig'.
2023/08/12 01:13:09 CLSRSC-325: Configure Oracle Grid Infrastructure for a Cluster ... succeeded
[root@racs1 grid]#
Node2 :
/u02/app/19.0.0/grid_home/root.sh
[root@racs2 ~]# /u02/app/19.0.0/grid_home/root.sh
Performing root user operation.
The following environment variables are set as:
ORACLE_OWNER= grid
ORACLE_HOME= /u02/app/19.0.0/grid_home
Enter the full pathname of the local bin directory: [/usr/local/bin]:
Copying dbhome to /usr/local/bin ...
Copying oraenv to /usr/local/bin ...
Copying coraenv to /usr/local/bin ...
Creating /etc/oratab file...
Entries will be added to the /etc/oratab file as needed by
Database Configuration Assistant when a database is created
Finished running generic part of root script.
Now product-specific root actions will be performed.
Relinking oracle with rac_on option
Using configuration parameter file: /u02/app/19.0.0/grid_home/crs/install/crsconfig_params
The log of current session can be found at:
/u02/app/grid_base/crsdata/racs2/crsconfig/rootcrs_racs2_2023-08-12_01-13-41AM.log
2023/08/12 01:13:46 CLSRSC-594: Executing installation step 1 of 19: 'SetupTFA'.
2023/08/12 01:13:46 CLSRSC-594: Executing installation step 2 of 19: 'ValidateEnv'.
2023/08/12 01:13:46 CLSRSC-363: User ignored prerequisites during installation
2023/08/12 01:13:46 CLSRSC-594: Executing installation step 3 of 19: 'CheckFirstNode'.
2023/08/12 01:13:47 CLSRSC-594: Executing installation step 4 of 19: 'GenSiteGUIDs'.
2023/08/12 01:13:48 CLSRSC-594: Executing installation step 5 of 19: 'SetupOSD'.
2023/08/12 01:13:48 CLSRSC-594: Executing installation step 6 of 19: 'CheckCRSConfig'.
2023/08/12 01:13:48 CLSRSC-594: Executing installation step 7 of 19: 'SetupLocalGPNP'.
2023/08/12 01:13:50 CLSRSC-594: Executing installation step 8 of 19: 'CreateRootCert'.
2023/08/12 01:13:50 CLSRSC-594: Executing installation step 9 of 19: 'ConfigOLR'.
2023/08/12 01:13:59 CLSRSC-594: Executing installation step 10 of 19: 'ConfigCHMOS'.
2023/08/12 01:13:59 CLSRSC-594: Executing installation step 11 of 19: 'CreateOHASD'.
2023/08/12 01:14:00 CLSRSC-594: Executing installation step 12 of 19: 'ConfigOHASD'.
2023/08/12 01:14:00 CLSRSC-330: Adding Clusterware entries to file 'oracle-ohasd.service'
2023/08/12 01:14:13 CLSRSC-4002: Successfully installed Oracle Trace File Analyzer (TFA) Collector.
2023/08/12 01:14:19 CLSRSC-594: Executing installation step 13 of 19: 'InstallAFD'.
2023/08/12 01:14:21 CLSRSC-594: Executing installation step 14 of 19: 'InstallACFS'.
2023/08/12 01:14:22 CLSRSC-594: Executing installation step 15 of 19: 'InstallKA'.
2023/08/12 01:14:23 CLSRSC-594: Executing installation step 16 of 19: 'InitConfig'.
2023/08/12 01:14:31 CLSRSC-594: Executing installation step 17 of 19: 'StartCluster'.
2023/08/12 01:15:18 CLSRSC-343: Successfully started Oracle Clusterware stack
2023/08/12 01:15:19 CLSRSC-594: Executing installation step 18 of 19: 'ConfigNode'.
2023/08/12 01:15:33 CLSRSC-594: Executing installation step 19 of 19: 'PostConfig'.
2023/08/12 01:15:39 CLSRSC-325: Configure Oracle Grid Infrastructure for a Cluster ... succeeded
[root@racs2 ~]#
Return to Console and click oK..
Click on Close .
Click on Close .
Install and Configure Oracle 19c Software binary
[oracle@racs1 db_home]$ pwd
/u01/app/oracle/product/19.0.0/db_home
[oracle@racs1 db_home]$
./runInstaller
Select the setup software only option, then click the Next button.
Accept the Oracle Real Application Clusters database installation option by clicking the Next button.
Make sure both nodes are selected, then click the Next button.
Select the Enterprise Edition option, then click the Next button.
Enter /u01/app/oracle as the Oracle base and /u01/app/oracle/product/19.0.0/db_home as the software location, then click the Next button.
Click the Next button.Accept the warnings on the subsequent dialog by clicking the Yes button
Next
Check the “Ignore All” checkbox and click the “Next” button.
Click the Install button.
When prompted, run the configuration script on each node. When the scripts have been run on each node, click the OK button.
Node1 :
[root@racs1 ~]# /u01/app/oracle/product/19.0.0/db_home/root.sh
Performing root user operation.
The following environment variables are set as:
ORACLE_OWNER= oracle
ORACLE_HOME= /u01/app/oracle/product/19.0.0/db_home
Enter the full pathname of the local bin directory: [/usr/local/bin]:
The contents of "dbhome" have not changed. No need to overwrite.
The contents of "oraenv" have not changed. No need to overwrite.
The contents of "coraenv" have not changed. No need to overwrite.
Entries will be added to the /etc/oratab file as needed by
Database Configuration Assistant when a database is created
Finished running generic part of root script.
Now product-specific root actions will be performed.
[root@racs1 ~]#
Node2 :
root@racs1 ~]# /u01/app/oracle/product/19.0.0/db_home/root.sh
Performing root user operation.
The following environment variables are set as:
ORACLE_OWNER= oracle
ORACLE_HOME= /u01/app/oracle/product/19.0.0/db_home
Enter the full pathname of the local bin directory: [/usr/local/bin]:
The contents of "dbhome" have not changed. No need to overwrite.
The contents of "oraenv" have not changed. No need to overwrite.
The contents of "coraenv" have not changed. No need to overwrite.
Entries will be added to the /etc/oratab file as needed by
Database Configuration Assistant when a database is created
Finished running generic part of root script.
Now product-specific root actions will be performed.
[root@racs1 ~]#
Click ok then Close ..
[oracle@racs1 db_home]$ ./runInstaller
Launching Oracle Database Setup Wizard...
The response file for this session can be found at:
/u01/app/oracle/product/19.0.0/db_home/install/response/db_2023-08-12_01-31-56AM.rsp
You can find the log of this install session at:
/u02/app/oraInventory/logs/InstallActions2023-08-12_01-31-56AM/installActions2023-08-12_01-31-56AM.log
[oracle@racs1 db_home]$
Oracle 19c Installation is completed.
Creating ASM Diskgroup using ASMCA Tool for database creation
[grid@racs1 ~]$ ps -ef |grep pmon
grid 1273 1065 0 01:21 pts/2 00:00:00 grep --color=auto pmon
grid 6417 1 0 01:11 ? 00:00:00 asm_pmon_+ASM1
[grid@racs1 ~]$
[root@racs2 ~]# ps -ef |grep smon
root 11690 11595 0 01:22 pts/1 00:00:00 grep --color=auto smon
root 21130 1 1 01:14 ? 00:00:05 /u02/app/19.0.0/grid_home/bin/osysmond.bin
grid 22768 1 0 01:15 ? 00:00:00 asm_smon_+ASM2
[root@racs2 ~]#
Select Disk Groups and create
Set the redundancy to External, click the 25GB DISK for Database configuration, then click the ok button. DATA disk Group
ARCHIVE disk Group
Start Oracle 19C Database Creation :
set the oracle database environment ..
cd $ORACLE_HOME
dbca
Select the Create Database option and click the Next button.
Select the Advanced configuration option.and click the Next button.
Select the General purpose or transaction processing and click the Next button.
Make sure both nodes are selected, then click the Next button.
Enter the Database Name and deselect CDB Database
Default select as it is and Click next
Deselect FRA and Archive log mode
Default as it is and Click next
Check ASMM Memory - all default
Default as it is and Click next
uncheck for em and run cluster ..
Enter oracle user Credential and click next
Select Create Database and click finish
Click on Finish :
Oracle 19c Rac Database Creation is completed.
Post-Checks : RAC Setup Check the Status of the RAC
ASM Instances and database status
DB node :
select INST_NUMBER,INST_NAME FROM v$active_instances;
SELECT instance_name, host_name FROM gv$instance;
[oracle@racs1 db_home]$ pwd
/u01/app/oracle/product/19.0.0/db_home
[oracle@racs1 db_home]$ dbca
[oracle@racs1 db_home]$ srvctl config database -d racsdb
Database unique name: racsdb
Database name: racsdb
Oracle home: /u01/app/oracle/product/19.0.0/db_home
Oracle user: oracle
Spfile: +DATA/RACSDB/PARAMETERFILE/spfile.268.1144635311
Password file: +DATA/RACSDB/PASSWORD/pwdracsdb.256.1144634977
Domain:
Start options: open
Stop options: immediate
Database role: PRIMARY
Management policy: AUTOMATIC
Server pools:
Disk Groups: DATA
Mount point paths:
Services:
Type: RAC
Start concurrency:
Stop concurrency:
OSDBA group: oinstall
OSOPER group: oinstall
Database instances: racsdb1,racsdb2
Configured nodes: racs1,racs2
CSS critical: no
CPU count: 0
Memory target: 0
Maximum memory: 0
Default network number for database services:
Database is administrator managed
[oracle@racs1 db_home]$
Thanks,
Srini