Showing posts with label PATCHING. Show all posts

Friday, 25 July 2025

Oracle 19C Database Jul-2025 RU patches download and Apply process

 Dear All,

In this post i am going to share Oracle latest Jul-2025 RU patches on Oracle 19C Database and RAC Databases, will share the steps how to download and apply step by step process.


First we need to login to support.oracle.com >> patches & download >> download the below patches as showed in the snaps.


You can watch @RACSINFOTECH YouTube channel for this patch apply live process >>>>>>>>>>>>>>>>>>>

Oracle 19C Non RAC patches : 


Oracle 19C RAC or Grid Patches : 37957391


click on download it will take while and then copy to server .

meanwhile read the read me file .


Once download completed , move those patches to respective databases and apply 

Apply procedure little different between RAC and Non RAC.

> check the conflicts if any 


Opatch utility :


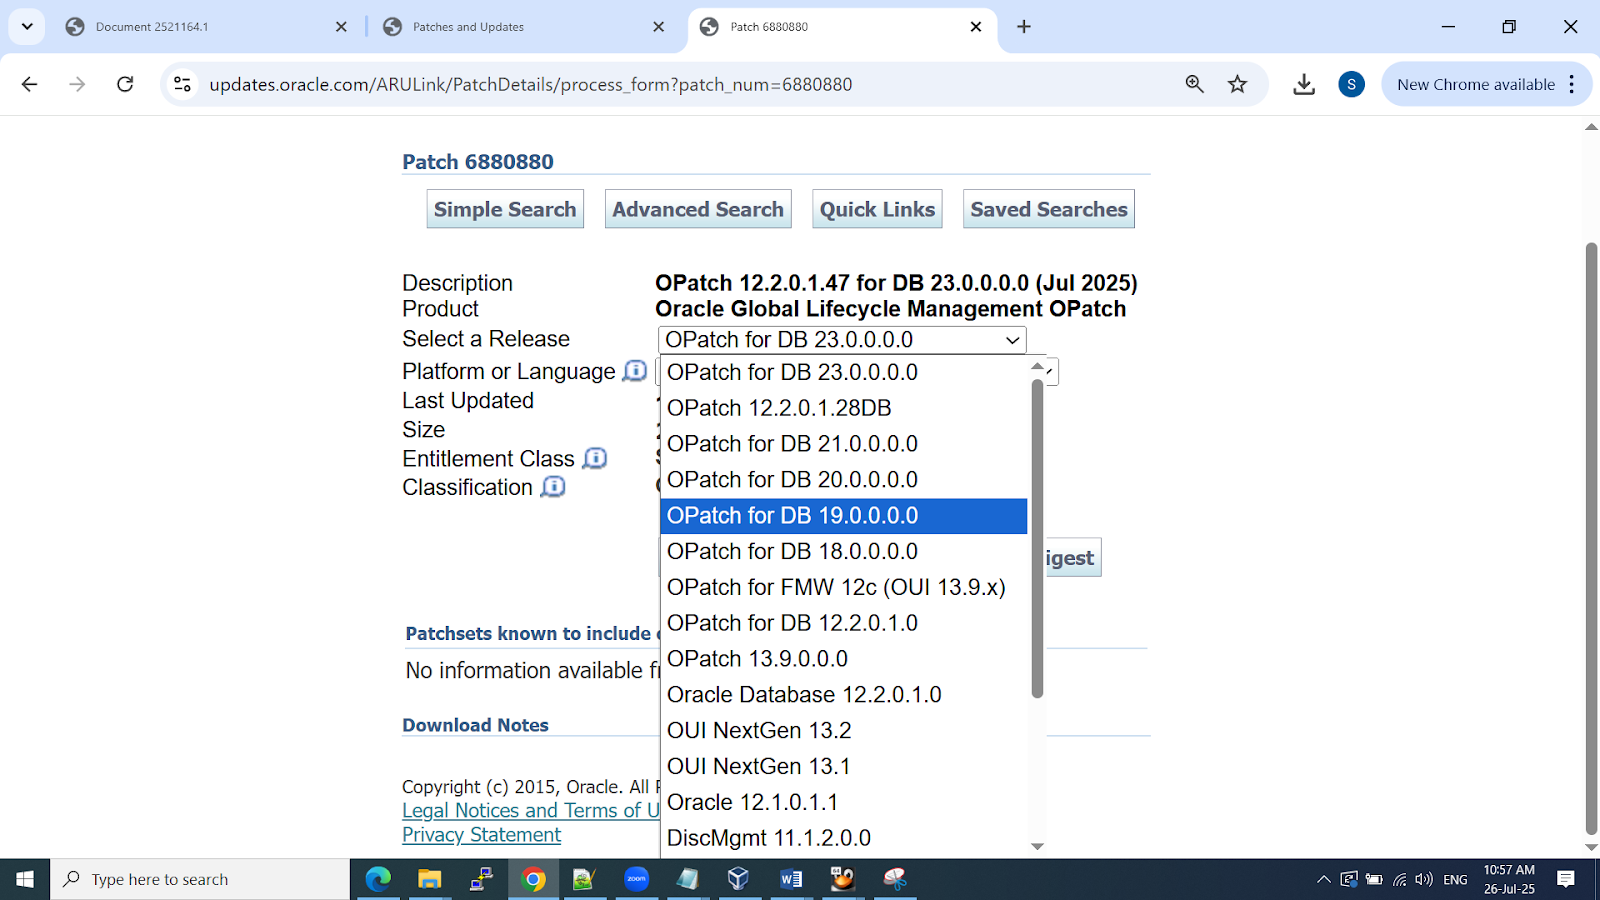
download latest opatch utility


Non RAC apply process : 

- download patch 

- copy to the server

- unzip the patch on database server

-check the pre-requisites like and pre-requisite patches there or not, sufficient storage is there or not, invalids, important configurations backup.

- take downtime and send communication to all.

-shutdown database and listener 

-apply patch using opatch

-startup database and listener 

-take invalids and compare before and after patch.

-run datapatch -verbose

-release the instance .


Non RAC apply process : 

- download patch 

- copy to the server

- unzip the patch on database server  ( common directory that patch should access rdbms and grid homes)

-check the pre-requisites like and pre-requisite patches there or not, sufficient storage is there or not, invalids, important configurations backup.

- take downtime and send communication to all.

-shutdown database and listener 

-shutdown grid , run rootcrs.pl prepatch ( rolling mode) node / node process

./rootcrs.pl -prepatch

-apply patch using opatchauto ( this we need to run from root user)

-this opatchauto apply the patches on grid home and rdbms homes at one go

-post patch start the grid and rdbms servers 

- ./rootcrs.pl -postpatch 


- do the above steps on all the nodes , once done run below steps .

-take invalids and compare before and after patch.

-run datapatch -verbose ( note : run only after patch completed on all the RAC nodes )

-release the instance .


You can watch @RACSINFOTECH YouTube channel for this patch apply process.


Thanks,

Srini


Tuesday, 6 May 2025

How to Apply APR-2025 RU patches in Oracle 19C Database step by step

 Dear All,

In this post i am sharing you Apply Apr-2025 RU patch step by step on Oracle 19C Database .

Apr-2025 RU patch Number :  

Patch 37641958: GI RELEASE UPDATE 19.27.0.0.0


Click on download patch option and read the readme file to check pre and post checks .

readme file : 

https://updates.oracle.com/Orion/Services/download?type=readme&aru=27123474

click on download patch :


Note : 
  • Document 19202504.9 Oracle Database 19c RU/RUR Apr 2025 Known Issues

After this download the latest opatch version - 6880880


copy the both opatch - patch 6880880 and Apr-2025 patch to database server and unzip it.


opatch readme file : https://updates.oracle.com/Orion/Services/download?type=readme&aru=27122750

>> First upgrade the opatch version .


After opatch upgrade : 


Download and unzip main patch on your database server 

[root@oemdb RU_19_27-GI]# unzip p37641958_190000_Linux-x86-64.zip -d /u01/software/


check inventory good :


check patch conflicts 


check invalids , take db full backup , take oracle home and customizations if anything backup before apply the main patches ..


SQL> select count(*) from dba_objects where status='INVALID';

  COUNT(*)
----------
         0

SQL> select name,open_mode from v$database;

NAME      OPEN_MODE
--------- --------------------
OEMDB     READ WRITE


Stop the database listener and database services 


export path ... 


Go to the patch location and apply the patch

Main APR-2025 RU patch ::

 $opatch apply 


apply second patch >> OCW patch 


Start up database and listener services 


Check the latest patch level ... 


Run datapatch verbose 


[oracle@oemdb OPatch]$ ./datapatch -verbose
SQL Patching tool version 19.27.0.0.0 Production on Wed May  7 01:47:58 2025
Copyright (c) 2012, 2025, Oracle.  All rights reserved.

Log file for this invocation: /u01/app/oracle/cfgtoollogs/sqlpatch/sqlpatch_17547_2025_05_07_01_47_58/sqlpatch_invocation.log

Connecting to database...OK
Gathering database info...done
Bootstrapping registry and package to current versions...done
Determining current state...done

Current state of interim SQL patches:
  No interim patches found

Current state of release update SQL patches:
  Binary registry:
    19.27.0.0.0 Release_Update 250406131139: Installed
  SQL registry:
    Applied 19.3.0.0.0 Release_Update 190410122720 successfully on 07-MAY-25 12.43.26.306463 AM

Adding patches to installation queue and performing prereq checks...done
Installation queue:
  No interim patches need to be rolled back
  Patch 37642901 (Database Release Update : 19.27.0.0.250415 (37642901)):
    Apply from 19.3.0.0.0 Release_Update 190410122720 to 19.27.0.0.0 Release_Update 250406131139
  No interim patches need to be applied

Installing patches...
Patch installation complete.  Total patches installed: 1

Validating logfiles...done
Patch 37642901 apply: SUCCESS
  logfile: /u01/app/oracle/cfgtoollogs/sqlpatch/37642901/27123174/37642901_apply_OEMDB_2025May07_01_49_39.log (no errors)
SQL Patching tool complete on Wed May  7 02:04:35 2025
[oracle@oemdb OPatch]$


Thanks,
Srini


Friday, 30 August 2024

How to apply Jul-2024 RU patches on Oracle 19C

 Dear All,


How to apply Jul-2024 RU patches on Oracle 19C :


1.    We need to check existing opatch patch version & last applied RU patches  and database versions.


2.    Download the latest RU patch from metal ink/ support.oracle.com

Oracle Database 19c Proactive Patch Information (Doc ID 2521164.1)

>> downloaded latest Jul 2024 RU patch  (36582781 )

>> downloaded latest Opath utility .( 6880688)


How to install the utility: Opatch utility install/ upgrade

-----------------------------------------------------------


To install this patch, Please extract the file "zipped file" using unzip or winzip,

depending upon the platform. You should extract the zip file directly under the

ORACLE_HOME. Please follow the following steps for extracting the zip file of OPatch.


(1)  Please take a backup of ORACLE_HOME/OPatch into a dedicated backup

location.

(2) Please make sure no directory ORACLE_HOME/OPatch exist.

(3) Please unzip the OPatch downloaded zip into ORACLE_HOME directory.


To check the version of the opatch utility installed in the above step,

go to the OPatch directory and run "opatch version".


Present : opatch version is : 12.2.0.1.17


After upgrade :  opatch version >> 12.2.0.1.43


3.    Copy the download patch to oracle database server.


By using Winscp I have copied the patches to my database server.

4.    Interim Patch Conflict Detection and Resolution.

 unzip p36582781_190000_Linux-x86-64.zip
 cd 36582781
export PATH=$ORACLE_HOME/OPatch:$PATH
 
opatch prereq CheckConflictAgainstOHWithDetail -ph ./


Check the invalids before patch apply
SQL> select count(*) from dba_objects where status='INVALID';
 
  COUNT(*)
----------
         0
 
SQL> show pdbs
 
    CON_ID CON_NAME                       OPEN MODE  RESTRICTED
---------- ------------------------------ ---------- ----------
         2 PDB$SEED                       READ ONLY  NO
         3 PDB                            READ WRITE NO
SQL> alter session set container=pdb;
 
Session altered.
 
SQL> select count(*) from dba_objects where status='INVALID';
 
  COUNT(*)
----------
         0

Take database home and orainventory backups .. ****

5.     Shutdown the database instance and listener services ..


lsnrctl stop LISTENER


6.     Apply JUL 2024 RU patch using opatch utility

./opatch apply


7.    Start database and listener


8.    Run datapatch verbose


9.    Release the instance .


Check the database open or not and send communication mail to team…


Thanks,

Srinivas


Tuesday, 31 May 2016

Finding Patch Level of a Product in Oracle Application


If we need to find the latest patch level for a particular product then we can use the below query.

Syntax:

select patch_level
from fnd_product_installations where patch_level like upper('%&product_name%')


Output:

PATCH_LEVEL                  
------------------------------
11i.AD.I.7
                    
 
Thanks 
Srini

Adpatch Overview


Adpatch is a utility provide for applying patches in the Oracle Apps. Patching is perfomed for updating the files verison, bug fixing or while doing upgrades.

Patch can be applied 2 ways

1.Offline  (taking application services down) . We need to enable maintenance mode before applying patch in offline mode using adadmin utility.
2.Online  (with application services running). We need to use hotpatch option while applying patch in online mode

There are 3 modes in which adpatch runs.

Modes of ADPATCH

1) Pre-Install Mode
Pre-install mode is used to update AD utilities before an upgrade and to apply family consolidated upgrade packs.
AutoPatch Pre-AutoInstall mode allows you to apply patches when your installation is missing database information and/or filesystem information that AutoPatch requires to run in normal mode.
Examples of when you would run AutoPatch in Pre-AutoInstall mode (and cannot run it in normal mode) include:
    Prior to installing Oracle Applications for the first time
    Prior to upgrading Oracle Applications to the latest release.
    During an upgrade (to apply a bug fix that stopped your upgrade)
Applying patch in pre-install mode performs following tasks:
    Version checking
    File copy actions
    Relink FND and AD executables
    Save patch history information to file system
AutoPatch in pre-install mode will NOT:
    Run SQL of EXEC command
    Generate files
    Read product driver files
    Apply maintenance pack
To apply patch in pre-install mode, run  adpatch preinstall=y

2) Test Mode
AutoPatch provides a test mode in which it tells you everything it would have done in applying a patch, but doesn’t actually apply the patch.
To run AutoPatch in Test Mode, you must include ‘apply=no’ on the AutoPatch command line. For example:
$ adpatch apply=no
Instead of performing an action, AutoPatch indicates that it is not performing the action because “Apply=No”. In general, AutoPatch lists each file it would have copied, generated, relinked, or executed. This shows you exactly what actions it would have performed.
AutoPatch test mode works the same as normal mode, with the following exceptions:
    It does not copy any files from your patch directory into your installation area.
    It does not copy any files from your APPL_TOP to JAVA_TOP or OAH_TOP.
    It does not archive any object modules into your product libraries.
    It does not generate any forms or reports.
    It does not relink any executables.
    It does not run any ‘sql’ or ‘exec’ commands.
    It does not update the release version in the database.
    It does not update the patch history file.
AutoPatch asks you the same initial questions in test mode as in normal mode. It performs the following actions to determine what it would have done if run in normal mode:
    Reads and validates the patch driver file.
    Reads product file driver files.
    Extracts object modules from your product libraries (so it can perform version checking on the object modules it extracts).
    Performs version checking.
    Looks in the database to determine what ‘sql’ and ‘exec’ comands it would have run.
Its a good practice to run the patch in test mode and analyze the things before applying the patch in normal mode.

3) Non-Interactive Mode
Starting in Release 11.5, you can run AutoPatch non-interactively bycreating a defaults file

Before you can run AutoPatch non-interactively, you must first create an AutoPatch defaults file for your current environment.

Steps for creating AutoPatch defaults file for your current environment:
1. Specify defaultsfile=<New Defaults File Name> on the AutoPatch command line. The defaults file must be located under $APPL_TOP/admin/<SID>.
For example:
adpatch defaultsfile=$APPL_TOP/admin/testdb1/my_def.txt
2. Run AutoPatch up to the point where it asks you for the directory where your Oracle Applications patch has been unloaded. Then type ‘abort’ at this prompt.
3. Verify that your defaults file exists.
Once you have an AutoPatch defaults file for your current environment, you can run AutoPatch non-interactively.
Applying a single patch driver file non-interactively
Before applying any Oracle Applications patch, either interactively or non-interactively, you should read the README file (usually called readme.txt) supplied with the patch. You should also read the documentation supplied with the patch (if any).
It is possible to apply just a single patch driver file non-interactively using AutoPatch. Here is an example:
Assume the following:
    defaults file is $APPL_TOP/admin/testdb1/def.txt
    Applying copy driver for patch 987654, which is located in directory $APPL_TOP/patch/987654.
    Using three parallel workers
    AutoPatch log file name is cpy987654.log
The AutoPatch command line would be:
adpatch defaultsfile=$APPL_TOP/admin/testdb1/def.txt \
logfile=cpy987654.log \
patchtop=$APPL_TOP/patch/987654 \
driver=u987654.drv \
workers=3 \
interactive=no
If we dont give any of the mode as mentioned above and apply the patch simply using adpatch command then its a normal mode of patch application.

Various Options used during adpatch.

Either these can be passed like <option_name>=<value> or adpatch will ask these value once its start executing.

Syntax
adpatch option_name= value
ex. adpatch defaultsfile=$APPL_TOP/admin/testdb1/def.txt
adpatch workers=16

1) defaultsfile
Purpose: This option is used when we are running the patch in non interactive mode. In that case we create defaults file and provide that file as an option for running patch in non-interactive mode.
Default: none. No default file read or written.

2) logfile
Purpose: This is the name of adpatch log file which it will write during patch application.
Default: none. Adpatch prompts for this value.

3) workers
Purpose: Specifies the number of workers to run. This value depends on number of CPU and other factors.
Default: none. Adpatch prompts for this value.

4) patchtop
Purpose: Top-level directory for the current patch. This is the directory after unzipping the patch. This directory will a patch number.
Default: none. Adpatch prompts for this value.

5) driver
Purpose: Name of the patch driver file. This comes with the patch and is present in patch directory.
Default - none. Adpatch prompts for this value.

6) restart
Purpose: To restart an existing session. Only valid when interactive=no is also specified
Default: No

7) localworkers
Purpose: Used in Distributed AD to specify the number of workers to be run on the current machine. If you have multi node instance (example RAC and shared APPL_TOP), then you can utilize this paramter to run the patch parallely in multiple nodes. You can start few workers on node 1, few on node 2 and so on. The way this can be done is that, you can start adpatch on one node with localworker=<some value less then total workers>. Then run adctrl on other node in distributed mode and start some mode workers. This will speed up the process and utilized the resources effectively.
Default: Value specified for workers.

8) printdebug
Purpose: To display extra debugging information.
Default: No.

Some other parameters which can be helpful for application of speeding up the patch application.

Syntax:
adpatch options=<value>
 
1) checkfile
Purpose: To skip running exec, SQL, and exectier commands if they are recorded as already run. Indicates that Autopatch should run the command *only* if a certain file is newer than the version of it that was last run. The idea behind it is to reduce the duration of an Autopatch session by skipping actions that don’t really need to be performed. When used in the right manner, it can dramatically improve Autopatch performance, especially for big patches and/or long running actions.
Default: checkfile (use ‘nocheckfile’ to skip)

2) compiledb
Purpose: To compile invalid objects in the database after running actions in the database driver.
Default: compiledb (use ‘nocompiledb’ to skip)

3) compilejsp
Purpose: To compile out-of-date JSP files, if the patch has copy actions for at least one JSP file.
Default: compilejsp (use’nocompilejsp’ to skip)

4) copyportion
Purpose: To run commands found in a copy driver. This will copy the higher version files from patch to product top.
Default: copyportion (Use ‘nocopyportion’ to skip. Use it only when mentioned in readme of patch)

5) databaseportion
Purpose: To run commands found in a database driver. This portion includes applying the files (like sql, pls etc) to database.
Default: databaseportion (use ‘nodatabaseportion’ to skip. Use it only when mentioned in readme of patch)

6) generateportion
Purpose: To run commands found in a generate driver. This portion will generate new executable files from the copied code of patch. For example if will generate new forms files (fmx) from new .fmb files.
Default: generateportion (use ‘nogenerateporation’ to skip)

7) integrity
Purpose: To perform patch integrity checking. Tells adpatch whether to perform patch integrity checking, which verifies that the version of each file referenced in a copy action matches the version present in the patch.
Default: nointegrity (By default the integrity is not checked)

8) maintainmrc
Purpose: To maintain the MRC schema after running actions found in the database driver.
Default: maintainmrc (use ‘nomaintainmrc’ to skip)

9) autoconfig
Purpose: Tells adpatch to run Autoconfig after patch installation.
Default: autoconfig (use ‘noautoconfig’ to skip)

10) parallel
Purpose: To run actions that update the database or actions (like SQL) that generate files in parallel (like genform).
Default: parallel (use ‘noparallel’ to skip)

11) prereq
Purpose: Tells adpatch whether to perform prerequisite patch checking prior to running patch driver files that contain actions normally found in the copy driver.
Default: prereq (use ‘noprereq’ to skip)

12) validate
Purpose: To connect to all registered Oracle Applications schemas at the start of the patch. Adpatch validates the passwords for each schema.
Default: novalidate (use ‘validate’ to validate schema passwords)

Below Flags can be passed to adpatch

1) hidepw
Purpose: This argument is used to hide the passwords in log files
Default: nohidepw
adpatch flags=nohidepw
2) trace
Purpose: Tells the adpatch utility whether to log all database operations to a trace file
Default: notrace
adpatch flags=notrace
3) logging
Purpose: Tells the adpatch utility whether to create indexes using the logging or nologging mode.
Default: logging
adpatch flags=logging


Log File Location

Patch log file location:
$APPL_TOP/admin/PROD/log


Worker Log file location:
$APPL_TOP/admin/PROD/log


Thanks 
Srini

Finding Patch related to a Product in Oracle Apps


If we need to find patches applied related to a product then we can use the below script to find them.

SELECT *
  FROM apps.ad_bugs
 WHERE trackable_entity_abbr = '&product_name'


Example:

SELECT *
  FROM apps.ad_bugs
 WHERE trackable_entity_abbr = 'fnd'


Thanks 
Srini

Tuesday, 2 February 2016

Applying Adpatch or autopatch and maintenance mode


Application Patch – Adpatch or Autopatch:

Why do we need patch?
  • For fixing a bug.
    • Bug: Customization or by release of new product, bug is encountered.
  • Adding new functionality / new module e.g. supplier management functionality.
  • Applying new product enhancement.
  • Upgrade to higher point release or release (like 12.X.1 to 12.X.2 or 12.1.X to 12.2.X)
  • Upgrading to higher family pack
    • It may contain bulk of patches.
    • Bugs reported by customer.

Patch can be downloaded from metalink in zip format and while we unzip any patch, It contains driver file- which directs adpatch for its activity, readme.txt file which is useful for DBA to apply patch and do analysis with preinstall task and post install tasks.

Patch Utilities:
  1. Command line utility
  2. Web based patch utility – Oracle application manager(OAM)

Command line patch utility are adpatch which is used for applying patch in application tier, admrgpatch which is used to merge multiple patch into single and can be applied the merged patch alone instead of applying all patches individually.

Admsi.pl at AD_TOP/bin :
Script for generating customized installation instruction for a patch that helps in tracking and performing manual steps during patch.
It can be executed in CLI (Command Line Interface) or GUI (Graphical User Interface).

We must do some check before we apply patch as:
  • Check the patch number in table ad_bugs and ad_applied_patches (SQL> select * from AD_BUGS where bug_number=’<patch number>’;)
  • Which module it belongs to and what would be the impact.

Step to apply adpatch:

  1. Download patch from metalink.
  2. Go to patch directory and unzip the patch.
  3. Go through readme.txt file and check for any pre-requisite and post requisite and take care accordingly.
  4. Shutdown the application services. (keep in mind database and listener should be up and running).
  5. Bring the application into maintenance mode using adadmin utility (discussed on later part of this post).
  6. Source the environment ( at App_Base/ apps/ apps_st/ appl/ APPS[SID]_[hostname].env).
  7. Apply the patch with adpatch
  8. Monitor the patch from log file at APPL_TOP/admin/SID/log
  9. Once patch is complete, check both adpatch.log and adpatch.lgi
  10. Disable the maintenance mode.
  11. Start all the application services and check for the patch applied.

How do we apply patch without enabling maintenance mode?
I would say use option=hotpatch and It is used when we apply patch when maintenance mode is disabled.
 
Do we need to run autoconfig after patching?
Adpatch takes care of it to update configuration files, if any template files are introduced by the patch.

Do we have to apply patch on all nodes for multimode system?
It depends. In a shared APPL_TOP system, changes made during patching session on one node are immediately available on all nodes.
If APPL_TOP is not shared , then have to apply patch individually to all nodes.

Adpatch.log : main autopatch log file.
Adpatch,lgi : autopatch informational messages.
adworkerXXX.log : for database operations run in parallel and have the worker log details.

Maintenance mode:

Why enable maintenance mode?
Maintenance mode is enabled to ensure optimal performance and reduce downtime during patching session. It shuts down the workflow business event system and set up function security so that oracle applications functions are unavailable to users. This provides a clear separation between normal runtime operation and system downtime for patching.

Enabling Maintenance Mode:

  • Set the environment App_Base/ apps/ apps_st/ appl/ APPS[SID]_[hostname].env.
  • Run the ad administration utility by typing adadmin on unix/linux console.

It will ask a series of questions with application and databse related information along with context file.Then it will show following options:

  1. Generate applications file menu.
  2. Maintain applications file menu.
  3. Compile/Reload Applications Database Entities Menu.
  4. Maintain Applications Database Entities Menu.
  5. Change Maintenance Mode.
  6. Exit ad Administration.

Select option 5. Now it will show the below option:

  1. Enable Maintenance mode.
  2. Disable Maintenance mode.
  3. Return to Main Menu.

Select option 1. Then return to console.

When we enable maintenance mode with adadmin utility, it calls setmmd.sql script located at FND_TOP/sql location. We can also enable / disable maintenance mode with this script.
 
Thanks
Srini